REMOVAL & INSTALLATION
DOOR PANEL
Removal & Installation
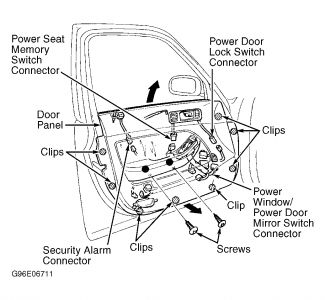
Remove inner door handle and mirror mount cover. Remove 2 armrest screws. Release clips holding door panel in place using a trim pad remover or other flat-blade tool. See Fig. 9 . Remove door panel by pulling gently upward. Disconnect wiring connectors. To install, reverse removal procedure.
Fig. 9: Removing Driver's Door Panel (Typical)
Courtesy of AMERICAN HONDA MOTOR CO., INC.
WINDOW MOTOR
NOTE:Window motor is part of regulator assembly. Entire assembly must be removed.
Removal & Installation
Remove door panel. See DOOR PANEL . Remove plastic sheet.
Lower the glass fully, then peel off the channel guide cover. See Fig. 10 . Remove the screws, then remove the rear channel guide by pulling it upward.
WARNING:Do not drop the glass inside the door.
Carefully move the glass until you can see the glass-to-regulator bolts, then remove them.
Carefully pull the glass out through the window slot. See Fig. 11 . Check the guide pin for damage Replace as necessary.
Disconnect motor harness connector and retaining clip. See Fig. 12 . Remove motor and regulator bolts. Remove the regulator and motor assembly through the center hole in the door.
Before installation, lube all the sliding surfaces of the regulator. See Fig. 12 . Installation is the reverse of the removal procedure.
Ensure the guide pin is installed in the rear channel guide properly. See Fig. 13 . When installing the channel guide cover, apply the double-faced adhesive tape to it.
Roll the glass up and down to see if it moves freely without binding. Also make sure that there is no clearance between the glass and glass run channel when the glass is closed. Adjust the position of the glass as necessary. See WINDOW GLASS under ADJUSTMENTS

SPONSORED LINKS
Thursday, November 20th, 2008 AT 4:07 PM
