Sure, we can help, here is a video to help vacuum down and recharge the system with a generic guide to help you step by step and I have included the instructions for your car in the images below.
https://youtu.be/4EqdrBVb0sY
and
https://www.2carpros.com/articles/replace-air-conditioner-compressor
CAUTION: Add only new lubricant when system requires additional lubricant. Do not use old reclaimed lubricant.
REMOVAL
The A/C compressor may be unbolted and repositioned without discharging the refrigerant system. Discharging is not necessary if removing the compressor clutch/coil assembly, engine, cylinder head, or alternator.
WARNING: REFRIGERANT PRESSURES REMAIN HIGH EVEN THOUGH THE ENGINE MAY BE TURNED OFF. DO NOT TWIST OR KINK THE REFRIGERANT LINES WHEN REMOVING A FULLY CHARGED COMPRESSOR. SAFETY GLASSES MUST BE WORN.
1. Disconnect battery negative cable.
2. Loosen and remove drive belts.
3. Using a R-134a refrigerant recovery machine, remove the refrigerant from A/C system. If the compressor is being replaced.
4. Disconnect compressor clutch wire lead.
5. Remove refrigerant lines from compressor, if necessary.
6. If system is left open place plug/cap over open lines.
7. Remove compressor attaching bolt.
8. Remove compressor. If refrigerant lines were not removed, lift compressor/clutch assembly and tie it to a suitable component.
INSTALLATION
- For installation, reverse the above procedures.
Search vehicle information
Community 8 Create Quote
1998 Dodge Neon L4-2.0L VIN C
A/C Compressor
Vehicle Heating and Air Conditioning Compressor HVAC Description and Operation Components A/C Compressor
A/C COMPRESSOR
SYSTEM OPERATION
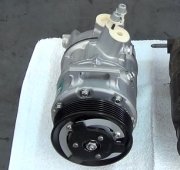
The compressor used on this vehicle is a Nippondenso 10PA17 R-134a. This compressor uses an aluminum swash plate, Teflon coated pistons and aluminum sleeved cylinder walls.
CAUTION: A 10PA17 R-12 compressor looks identical to a 10PA17 R-134a and will bolt up to the vehicle. The 10PA17 R-12 compressor must not be used on this system. It is extremely important that a 10PA17 R-134a compressor is identified prior to using compressor in question. Check tag located on compressor for model number.
Noise
Excessive noise that occurs when the air conditioning is being used may be caused by:
- Loose bolts
- Mounting brackets
- Loose compressor clutch
- Excessive high refrigerant operating pressure
Verify the following before compressor repair is performed:
1. Compressor drive belt condition
2. Proper refrigerant charge
3. Thermal expansion valve (TXV) operating correctly
4. Head pressure is normal
Compressor Front Shaft Seal
The compressor front shaft seal is not serviceable. If a leak is detected at the shaft seal, the compressor must be replaced as a unit.
Please let us know if you need anything else to get the job done.
Sunday, January 29th, 2023 AT 6:40 PM


