Good morning,
Make sure the coolant level is correct.
https://www.2carpros.com/articles/car-heater-not-working
When you command heat and cool, can you hear the blend door move back and forth in the dash?
https://www.2carpros.com/articles/replace-blend-door-motor
Does the temperature go up to normal when running?
https://www.2carpros.com/articles/how-an-engine-thermostat-works
Roy
Removal and Installation
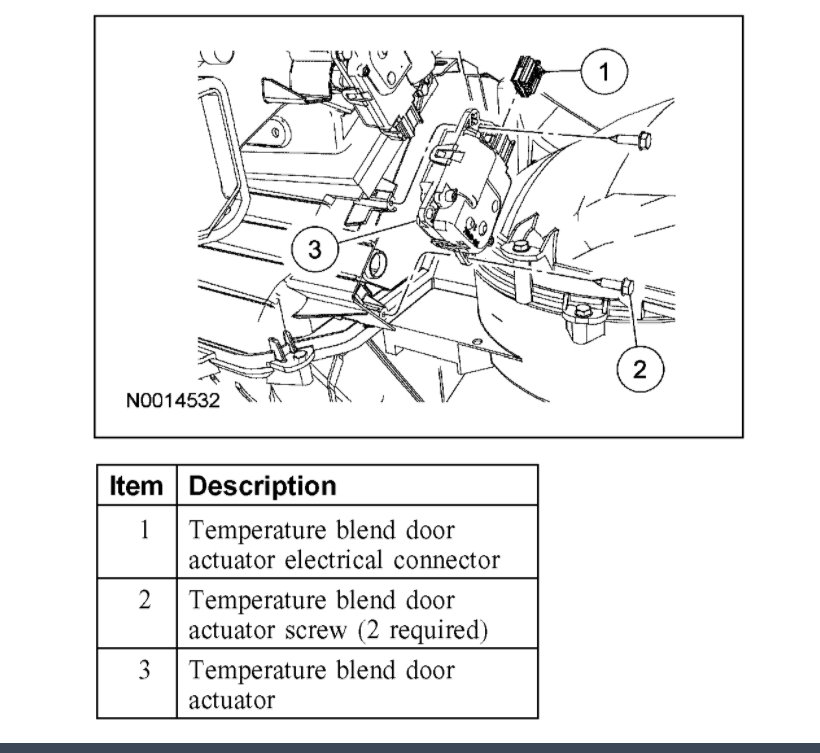
1. Lower the glove compartment.
2. Disconnect the temperature blend door actuator electrical connector.
3. Remove the 2 temperature blend door actuator screws.
4. Remove the temperature blend door actuator.
5. To install, reverse the removal procedure.
6. NOTE: The purpose of the module actuator position calibration is to allow the HVAC module to reinitialize and calibrate the actuator stop. points. To carry out calibration, carry out the following steps.
Remove Smart Junction Box (SJB) fuse 10 and SJB fuse 12 for at least one minute.
7. NOTE: When the ignition switch is switched to the "on" position, the HVAC module will initialize and calibrate the actuators. Calibration of the actuators will take approximately 30 seconds.
NOTE: If the actuator fails to calibrate correctly (mode door does not work correctly), inspect the plenum chamber for foreign objects or debris. Reinstall SJB fuse 10 and SJB fuse 12. Turn the ignition switch to the on position and wait 30 seconds before verifying correct operation.
Removal and Installation
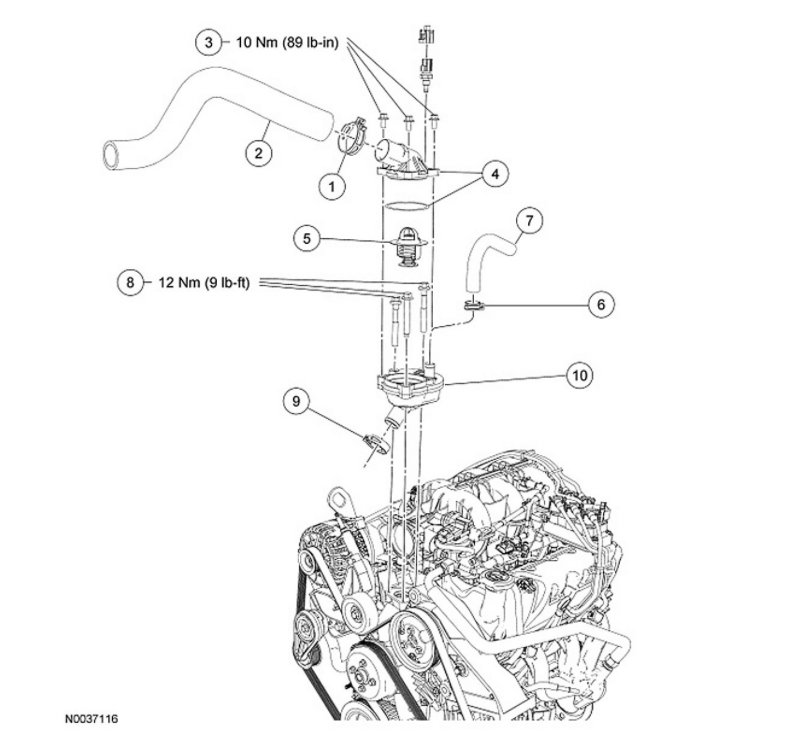
1. Drain the cooling system.
2. Remove the Air Cleaner (ACL) outlet pipe.
3. Remove the Throttle Body (TB).
4. Remove the 3 upper thermostat housing bolts and position aside the thermostat housing.
- Discard the thermostat O-ring seal.
- To install, tighten to 10 Nm (89 lb-in).
5. Remove the thermostat.
6. To install, reverse the removal procedure.
- Install a new thermostat O-ring seal and lubricate with clean engine coolant.
7. Fill and bleed the cooling system.
Images (Click to make bigger)
Tuesday, December 8th, 2020 AT 7:23 AM


