Hello,
Here is a link to the diagram you need to get the problem fixed.
https://www.2carpros.com/diagrams/mazda/b2000/1986
Step by step guide
TIMING BELT
Removal
Disconnect negative battery cable. On B2200, drain cooling system. Radiator removal may be
required. Remove cooling fan and shroud. Remove distributor from front housing. Remove
cooling fan pulley and bracket. Remove secondary air pipe assembly (carbureted engines).
1. On all models, remove all accessory drive belts. Remove crankshaft pulley. Remove timing belt
covers. Remove baffle plate located in front of crankshaft sprocket. Note direction of baffle
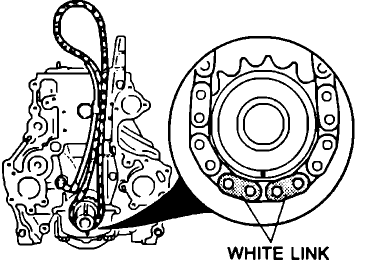
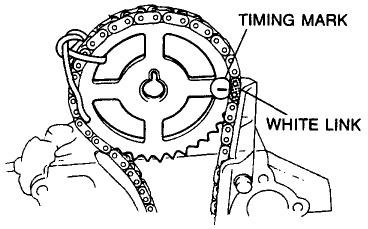
plate installation. Align camshaft pulley with front housing timing mark. See Fig. 1 or Fig. 2.
Mark an arrow on timing belt to indicate direction of travel. Remove tensioner lock bolt,
tensioner and spring. Remove timing belt. On 2.2L engines, measure free length of tensioner
spring. Replace spring if free length is not 2.48" (63 mm). See Fig. 3.
2. Installation
Align camshaft pulley with front housing timing mark. Align crankshaft pulley with pointer on
oil pump body. See Fig. 1 or Fig. 2. Install tensioner, lock bolt and tensioner spring. Position
timing belt tensioner to its limit of travel toward the intake manifold side, and partially tighten
lock bolt.
1. Install timing belt onto crankshaft pulley and then camshaft pulley. Install timing belt from
tension side (right side, as viewed from engine front). If timing belt is being reused, ensure that
arrow is pointing in direction of travel.
2. Loosen tensioner lock bolt to apply tension. To apply equal tension to each side of timing belt,
turn crankshaft 2 revolutions in direction of travel. Tighten tensioner lock bolt. Check for
proper alignment of timing marks.
3. Check for proper belt tension by measuring amount of deflection midway between idler pulley
and camshaft sprocket. Belt deflection should be.30-.33" (7.6-8.4 mm) when force of 22 lbs.
(10 kg) is applied. See Fig. 1 or Fig. 2. Repeat adjustment if deflection is not within
specification.
4. Reverse removal procedure to complete installation. Adjust drive 5. Belts to proper tension.
Please let me know if you need anything else to get the problem fixed.
Best, Ken
Oct 2, 2018 at 5:58 AM
(Merged)