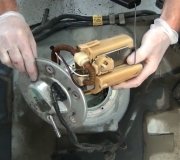
You should have let Volvo do the repair. The pump may have being covered by the 10 year/ 150,000
mile warranty. What you can do now is remove the pump and make sure the level float is not hanging up on the harness. Check both the fuel pump side and the left side level sensor. If all that is clear reinstall both the left level unit and the fuel pump on the right side. There is a little triangle mark that is suppose to be the arrow. Make sure it is pointing up when you tighten down both units down. If it is not pointing up the float will not move.
Heres the instructions, be sure you followed them
Level sensor, fuel tank/fuel pump, replacement
Removal
Note! As the illustrations in this service information are used for different model years and / or models, some variation may occur. However, the essential information in the illustrations is always correct.
Draining the fuel system and fuel tank
Drain:
- the fuel system. See Draining the fuel system See: Fuel Delivery and Air Induction > Procedures.
- the fuel tank. See Draining the fuel tank See: Fuel Delivery and Air Induction > Procedures.
Removing the left-hand level sensor
Remove:
- the two connectors from the underneath of the left-hand level sensor
- the left-hand level sensor from the ejector on which it is positioned.
Note! Secure a wire in the area of the ejector. The wire must be sufficiently long that it reaches over to the opposite side of the tank with some excess remaining to ensure that it does not slide into the tank. The wire is needed to pull the hoses and wiring back to the left-hand side of the tank after the fuel tank unit has been replaced.
Removing the right-hand level sensor / pump
- Grip the right-hand level sensor and pump holder and pinch the float so that it is held in its lowest position.
Note! Take care with the fuel tank.
Carefully and slowly pull up the holder. Carefully work the holder out.
Pull the hoses out from the tank without pulling up the entire wire from the right-hand hole in the tank.
Note! It is extremely important that the float arm is not broken or bent.
Remove the wire from the old level sensor and pump ejector.
Removing the right-hand level sensor
Remove:
- the tie straps around the protective sheath, hoses and wiring
- the net protective sheath by carefully threading it off the hoses and wiring
- the tie strap under the protective sheath.
Remove:
- the tie strap around the wiring above the pump
- the level sensor by pressing in the two clips and pulling upwards
- the thin pipe from the holder on the outside of the fuel tank unit
- the wiring from the holder in the fuel tank unit.
Installation
Only applies to vehicles with parking heaters
If the vehicle has an engine block heater, drill out the hole connection in the fuel tank unit. Use a -4 mm drill bit. Transfer the dip pipe.
Installing the right-hand level
Install:
- the new level sensor
- the wiring in the holder
- the thin pipe in the holder on the outside of the fuel tank unit
- the tie strap around the wiring above the pump.
Install:
- the tie strap under the protective sheath
Note! Secure the tie strap on the smooth central section of the corrugated hose.
- the protective sheath
- four tie straps around the protective sheath, hoses and wiring. Secure the tie straps on the four smooth central sections of the corrugated hose.
Installing the right-hand level sensor and pump and the left-hand level sensor in the fuel tank
If the fuel tank is replaced, see next step.
- Install the wire on the new ejector for the level sensor and pump
- Insert the hoses and wiring into the tank via the right-hand tank hole
- Grip the right-hand level sensor and pump holder and pinch it so that the float is held in its lowest position
- Carefully and slowly lower the holder. Carefully work the holder into place
- Pull the wire so that the hoses and wiring end up on the left side of the tank
- Install the left-hand level sensor on the ejector
- Install the switches on the underneath of the left-hand level sensor
- Remove the wire from the ejector.
Cable routing when replacing the fuel tank
If replacing the fuel tank, wire cannot be used.
The image shows how to route the fuel lines and electrical wiring in the tank. Use a plastic pipe at least 1.7 m long.
Hint: Use spare part plastic pipe between the carbon filter and EVAP valve.
Insert the hose through the hole for the level sensor on the left-hand side of the vehicle and press it through the tank and take the end of the hose through the hole for the fuel pump.
Tape the fuel pump's fuel lines/electrical wiring to the plastic pipe.
Pull the wiring out of the hole for the level sensor. Remove the plastic pipe and the tape. Check that there is no tape/adhesive residue on the wiring.
Pull the wiring forwards and backwards to check that it has not bent or got trapped.
Finishing
- Install the sensor, backrest, side cushion and seat cushion. See Draining the fuel tank See: Fuel Delivery and Air Induction > Procedures.
See the diagrams below as well
Images (Click to make bigger)
Monday, October 26th, 2009 AT 12:16 AM


