Hello -
I believe this is the info you are requesting.
Headlamps, removing and installing
NOTE: "Â It is not necessary to disconnect battery.
"Â Illustrations depict removal and installation of left headlamp.
Removing:
"Â Switch off ignition, switch off all electrical components and remove ignition key.
"Â Press against headlamp.
Fig. 267: Turning Locking Bolt In Direction Of Arrow Open (Sticker)
Courtesy of VOLKSWAGEN UNITED STATES, INC.
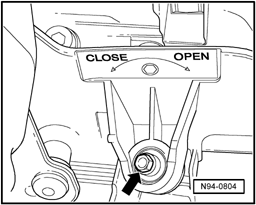
"Â Turn locking bolt - arrow - in - direction of arrow Open (sticker) - until resistance is felt.
NOTE: "Â Do not use force to turn bolt further, otherwise the locking mechanism will be destroyed.
Headlamp is pushed toward front.
"Â Pull headlamp out of opening on body until resistance is felt.
Fig. 268: Identifying Locking Clip
Courtesy of VOLKSWAGEN UNITED STATES, INC.
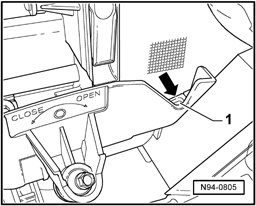
"Â Hold locking clip - 1 - pressed - arrow - and remove headlamp from opening on body.
Installing:
Fig. 269: Identifying Guides
Courtesy of VOLKSWAGEN UNITED STATES, INC.
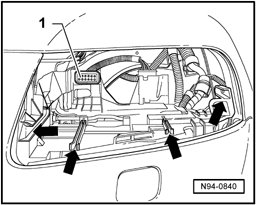
NOTE: "Â Guides - arrows - must be free of dirt.
"Â Check connector - 1 - in headlamp mount for proper fitting before inserting headlamp into guides.
"Â Set headlamp into guides - arrows -.
"Â Slide headlamp into opening on body.
NOTE: "Â A significant "clicking" must be audible. Securing clip engages.
Fig. 270: Turning Locking Bolt In Direction Of Arrow Open (Sticker)
Courtesy of VOLKSWAGEN UNITED STATES, INC.
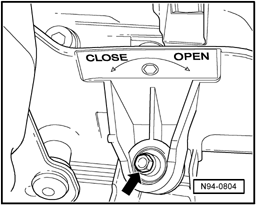
"Â Turn locking bolt - arrow - in - direction of arrow Close (sticker) - until resistance is felt.
"Â Press lightly against headlamp and turn further in - direction of Close arrow (sticker) -.
Securing bracket must engage audibly.
NOTE: "Â Do not use force to turn bolt further, otherwise the locking mechanism will be destroyed.
"Â Check installation position of headlamp for uniform gap dimensions.
If the gaps are uneven in relation to body, headlamp position must be corrected à †’ Headlamp installation position, correcting.
"Â Check headlamp for function.
SPONSORED LINKS
Saturday, February 28th, 2009 AT 6:51 PM


