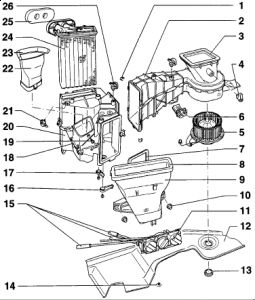
With A/C

1 - Clip
2 - Air duct with main shut-off flap--do not disassemble further
3 - Gasket
4 - Wire clip
5 - Fresh air blower (V2)
6 - Fresh air blower series resistance with fuse (N24)
7 - Gasket
8 - Gasket--always replace
9 - Air duct
10 - Nut
11 - Fresh air/heating controls
12 - Cover
13 - Plug
14 - Clip
15 - Control cables
16 - Central flap lever
17 - Temperature flap lever
18 - Footwell/defrost flap lever
19 - Self-tapping screw
20 - Air distribution housing--do not disassemble further
21 - Wire clip
22 - Air duct connector
23 - Gasket--always replace
24 - Heater core
25 - Gasket--always replace
26 - Wire clip
Removal :
1.Discharge A/C system.
2.Remove instrument panel. See: Body and Frame Interior Moulding / Trim Dashboard / Instrument Panel
3.Remove housing support bracket.
4.Disconnect heater core hoses and plug heater core outlets (to prevent coolant spills).
5.Remove heater box/evaporator housing.
Installation:
1.Install seals around perimeter of heater core so there are no gaps, and glue in place.
2.If heater core does not lock into place during installation, fasten to heater box using screws through tabs on top of heater core.

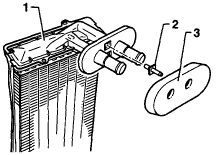
3.When replacing the heater core (1) with fresh/recirculating air flap, Install vacuum hose adaptor (2) on new heater core.
4.Replace gasket (3).
5.Remainder of installation is the reverse of removal.
Saturday, January 16th, 2010 AT 2:24 AM

