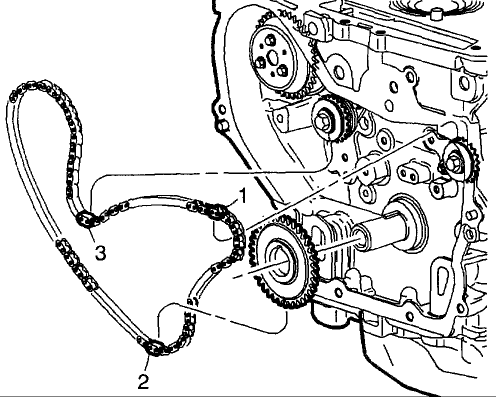
Orient the timing marks on the balance shafts.
1.1. The intake side balance shaft timing mark should be pointing up.
1.2. The exhaust side balance shaft timing mark should be pointing down.
With balance shafts oriented, install balance shaft crankcase sprocket onto crankshaft.
Place number one piston at Top Dead Center (TDC).
NOTICE: The crankshaft keyway slot will be pointing up (12 o'clock position) when set at TDC.

Install balance shaft chain with colored links lined up)with marks on balance shaft sprockets with mark on crankshaft sprocket.
IMPORTANT: There is one (1) copper link and two (2) chrome links on balance shaft chain.
4.1. Orient chain so that copper (1) and chrome (2) links are visible.
4.2. Place copper colored link (1) onto timing mark on intake side balance shaft sprocket.
4.3. Working clockwise along chain, place first chrome link in line with timing mark on crankshaft sprocket.
4.4. Align last chrome link with timing mark on exhaust side balance shaft sprocket.
Install upper chain guide and bolt. Torque:
Balance Shaft Chain Guide (Upper) Bolts: 10 Nm (89 inch lbs.)
Install small chain guide and bolt.
Tighten chain guide bolt. Torque:
Balance Shaft Chain Guide (Fixed) Bolts: 10 Nm (89 inch lbs.)
Install adjustable chain guide and bolts. Torque:
Balance Shaft Chain Guide (Adjustable Bolt: 10 Nm (89 inch lbs.)
Rotate plunger on chain tensioner 90°. Compress plunger and lock in place by inserting a thin wire (or paper clip) into the hole on side of plunger body.
Install balance shaft drive chain tensioner and bolts.
Tighten balance shaft drive chain tensioner bolts. Torque:
Balance Shaft Chain Tensioner Bolts: 10 Nm (89 inch lbs.)
Remove thin wire (or paper clip) from chain tensioner to release plunger.
Thursday, October 20th, 2016 AT 10:34 AM
