THERMOSTAT
NOTE:Use the correct fastener in the correct location. Replacement fasteners must be the correct part number for that application. Fasteners requiring replacement or fasteners requiring the use of thread locking compound or sealant are identified in the procedure. DO NOT use paints, lubricants or corrosion inhibitors on fasteners or fastener joint surfaces unless specified. These coatings affect fastener torque and joint clamping force and may damage the fastener. Use the correct tightening sequence and specifications when installing fasteners in order to avoid damage to parts and systems.
Removal & Installation
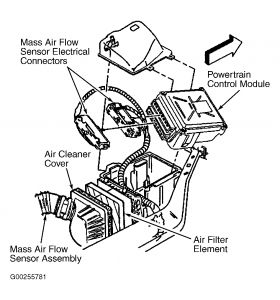
Remove the air cleaner and duct assembly. See Fig. 10. Drain the coolant until the coolant level is below the thermostat. See COOLING SYSTEM BLEEDING.
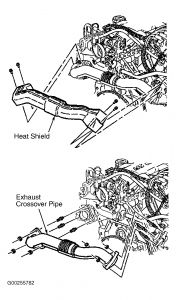
Remove the crossover exhaust pipe. See Fig. 11. Remove the radiator hose from the thermostat housing.
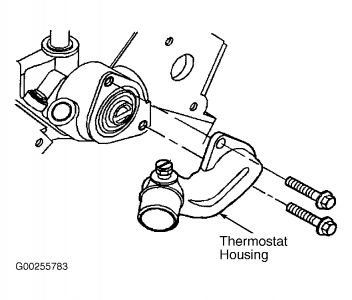
Remove the thermostat housing bolts and clean any sealer from the bolt threads. See Fig. 12. Remove the thermostat housing and gasket.
Remove the thermostat. Inspect and clean the mating surfaces.
Install the thermostat housing and gasket. Install RTV sealer (GM P/N 1052366) to the thermostat housing bolt threads. Install the thermostat housing bolts. See TORQUE SPECIFICATIONS.
To complete installation, reverse removal procedure. Fill the cooling system. Inspect the cooling system for leaks. Repair as necessary.


SPONSORED LINKS
Sunday, August 15th, 2010 AT 9:05 AM


