Hello phillipbonine. . .. . .. . .. . ..
Sorry for the delay in getting back with you. . .. . .. . ..I encountered some technical difficulties. . .. . .. . ...
On your last post. . .. . ..not sure what you are talking about here. . .. . ...but will press
If I understand your 26 Mar post as it is hard to read, you said you did go to AZ and they checked for codes and there were no codes sent.
Now if you are concerned about that there were not any codes, that is all part of the troubleshooting procedures. You start with the basics and work your way to the more difficult. I started with step 3 of Diagnostic System Check assuming a visual check of components and wiring could be skipped.
As you also see in step 4 it states: "If any DTCs are displayed, go to next step. If no DTCs are displayed go to appropriate symptom."
So logically the first step here is to see if the car will throw a code. If not we go with the appropriate symptom.
DIAGNOSTIC SYSTEM CHECK
1. Reconnect any disconnected components. Perform visual check of components and wiring. If any problems are found during visual inspection, go to next step. If visual inspection is okay, go to step 3 .
2. Repair or replace wiring and/or components as necessary. After repair, go to next step.
3. Ensure ignition switch is in OFF position. Install scan tool to Data Link Connector (DLC). DLC is located under instrument panel near steering column. Turn ignition switch to ON position. Following scan tool manufacturer's instructions, attempt to communicate with Heating, Ventilation and Air Conditioning (HVAC) system, Body Control Module (BCM) and Powertrain Control Module (PCM). If scan tool communicates with all systems, go to next step. If scan tool does not communicate with all systems, go to appropriate BODY CONTROL MODULES article in ACCESSORIES & EQUIPMENT.
4. Using scan tool, select DISPLAY DTCs function for HVAC system, BCM and PCM. If any DTCs are displayed, go to next step. If no DTCs are displayed go to appropriate symptom.
Since your air delivery is improper - here is the troubleshooting you will have to do. Figures are attached. You already performed step one by having AZ check for codes, so start with step 2.
2000 Models
1. Perform DIAGNOSTIC SYSTEM CHECK . Go to next step.
2. Operate A/C-heater system using all mode and temperature functions to verify improper air delivery complaint. If air delivery is normal, problem is intermittent. Check for faulty connections, damaged wiring harness or faulty connectors. Repair or replace as necessary. If air delivery is improper, go to next step.
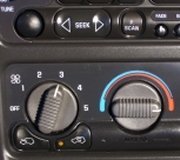
3. Set parking brake and start engine. Set blower motor control knob to medium speed position. Cycle mode control through all positions. See Fig. 3 . Check for proper airflow at each mode position. If airflow is as specified, go to step 8 . If airflow does not change at any mode position, go to next step.
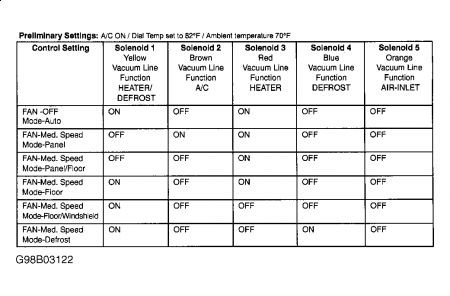
4. Place one hand on solenoid assembly, located under instrument panel. See Fig. 4 . Cycle mode control through all positions. If solenoids are felt energizing, go to next step. If solenoids are not felt energizing, go to step 6 .
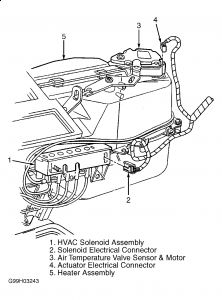
5. Attach vacuum gauge to Gray vacuum line for solenoid assembly. If vacuum exists, go to step 12 . If vacuum does not exist, go to step 7 .
6. Check Brown wire for open between A/C-heater control panel connector terminal C6 and splice pack SP200. SP200 is located in front center of instrument panel, strapped to body harness. See WIRING DIAGRAMS . Repair Brown wire as necessary. After repair, go to step 13 .
7. Check for disconnected, loose, broken, pinched or blocked vacuum hoses. Repair as necessary. After repair, go to step 13 .
8. Connect scan tool to Data Link Connector (DLC). DLC is located under instrument panel, near steering column. Perform solenoid test using scan tool. Cycle solenoids No. 1 through 5. Place hand on each solenoid while energizing it with scan tool. Note which solenoids fail to operate. Disconnect A/C-heater control panel harness connector. Check for open, short to ground or short to voltage in circuitry between A/C-heater control panel harness connector and suspect solenoid. If any condition exists, go to next step. If all circuits test okay, go to step 10 .
9. Repair suspect circuit as necessary. See WIRING DIAGRAMS . After repair, go to step 13 .
10. Disconnect A/C-heater control panel harness connector. Turn ignition switch to ON position. Use a DVOM to measure voltage at A/C-heater control panel connector terminal that corresponds with faulty circuit found in step 8 . If battery voltage exists, go to next step. If battery voltage does not exist, go to step 12 .
11. Replace A/C-heater control panel. See A/C-HEATER CONTROL PANEL under REMOVAL & INSTALLATION. After repair, go to step 13 .
12. Replace solenoid assembly. See SOLENOID ASSEMBLY under REMOVAL & INSTALLATION. After repair, go to step 13 .
13. Operate A/C-heater system using all mode and temperature functions to verify repair. If air delivery is normal, repair is complete. If air delivery problem still exists, return to step 3 .
Fig. 4: Location Of Solenoid Assembly
Courtesy of GENERAL MOTORS CORP.
Now I haven't' attached wiring diagrams. . ...you may not need them.
Best guess would be possible the electronic air mix (temperature) door actuator. This has a feedback potentiometer on it that signals the A/C heater control panel with air mix door positions.
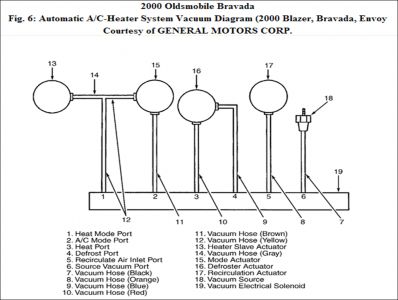
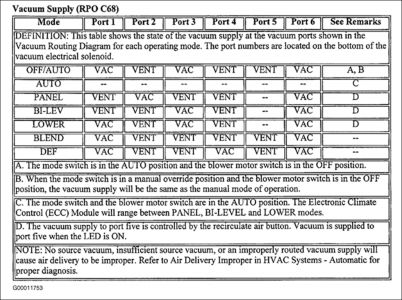
I have also attached Fig 6 for your review. As you see the note states: "No source of vacuum, insufficient source f vacuum, or an improperly routed vacuum supply will cause air delivery to be improper."
Check your engine - all the vacuum hoses for proper connections, splits, tears and any that are loose also.
Last, I had to break Fig 6 into two parts. If the others are still too small let me know which ones and I will try to blow them up more. Remember to right click save them to your computer and it is possible you can blow them up for better viewing.
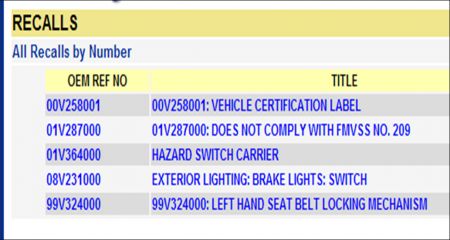
Also, it looks like you may have some recalls on your vehicle. The dealer may fix these for free. Please contact the dealer service department, give them the VIN number of your car and have them check on these to see if they apply to you.
Friday, March 27th, 2009 AT 7:54 PM


