Change rear brakes

Tiny
YYY420
  • MEMBER
  • 2005 JAGUAR X-TYPE
  • 6 CYL
  • AWD
  • AUTOMATIC
  • 44,000 MILES
Step by step instructions to change rear brake and rotors?
Friday, August 14th, 2009 AT 8:49 PM

8 Replies

Tiny
JACOBANDNICKOLAS
  • MECHANIC
  • 109,755 POSTS
Hi,

Replacing the rear brake pads and rotors isn't too hard to do. Just make sure to get a lifetime pad so you don't have to pay for them again in the future.

You can expect rear brake pads to last approximately 30,000 miles. However, that will change based on driving habits and terrain.

To get you started, here is a link that explains in general how it is done. You can use this as a guide.

https://www.2carpros.com/articles/how-to-replace-rear-brake-pads-and-rotors

If you look at the attachments below, they provide the directions specific to your vehicle for rear brake pad and rotor replacement.

I hope this helps. Let me know if you have other questions.

Take care,

Joe

See pics below.
Was this
answer
helpful?
Yes
No
Wednesday, May 12th, 2021 AT 7:10 PM
Tiny
SXFT
  • MEMBER
  • 1 POST
  • 2004 JAGUAR X-TYPE
  • 6 CYL
  • AWD
  • AUTOMATIC
  • 85,400 MILES
I would like to know what tools are needed to change my rear brake pads
Was this
answer
helpful?
Yes
No
Sunday, May 23rd, 2021 AT 12:59 PM (Merged)
Tiny
DAVE H
  • MECHANIC
  • 13,383 POSTS
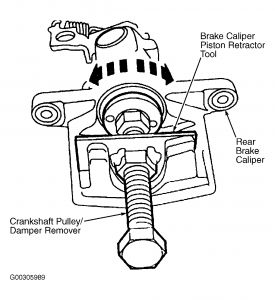
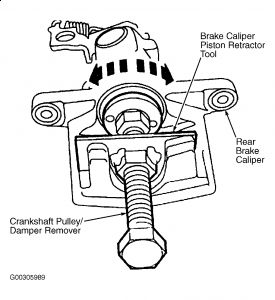
Using the Brake Caliper Piston Retractor Tool fully retract the rear brake caliper piston into the caliper housing. See Fig. 64 .


https://www.2carpros.com/forum/automotive_pictures/266999_jag_105.jpg


NOTE:The left rear brake caliper piston retracts counterclockwise and the right rear caliper piston retracts clockwise.
Was this
answer
helpful?
Yes
No
+3
Sunday, May 23rd, 2021 AT 12:59 PM (Merged)
Tiny
DAVIDDIAZ3971
  • MEMBER
  • 3 POSTS
  • 2004 JAGUAR X-TYPE
  • 6 CYL
  • AWD
  • AUTOMATIC
  • 61,000 MILES
How do I replace rear disc pads
Was this
answer
helpful?
Yes
No
Sunday, May 23rd, 2021 AT 12:59 PM (Merged)
Tiny
DAVE H
  • MECHANIC
  • 13,383 POSTS
Hello ... thanks for the donation .. much appreciated.

REAR DISC BRAKE PADS
WARNING:Brake dust, if inhaled can damage your health. Always remove brake dust using a vacuum brush. Do not use a compressed air line to disperse brake dust into the atmosphere.

NOTE:Special tools required: universal Brake Caliper Piston Retractor Tool or jaguar Brake Caliper Piston Retractor Tool(206-080) and Crankshaft Pulley/Damper Remover (303-588).

NOTE:Brake pads must always be replaced in axle sets.

Removal
Open engine compartment hood and fit paint protection covers to fenders. Raise and support vehicle. Remove rear wheels.
Release the tension on the parking brake cable by moving the parking brake caliper lever away from the cable end. Remove cable from parking brake cable lever.
Remove the parking brake cable from the rear brake caliper.
On vehicles with manually adjusted parking brakes, remove the retaining clip.
On vehicles with self-adjusting parking brakes, release the tabs on the parking brake cable housing.
Remove and discard the rear brake caliper retaining bolts. Remove the rear brake caliper and secure to one side.
Remove the rear brake pads.
Clean and inspect caliper and all associated parts.

Installation
CAUTION:Retracting the caliper piston may cause the fluid reservoir to overflow. Remove brake fluid spillage immediately from paint work with clean water.

NOTE:The left rear brake caliper piston retracts counterclockwise and the right rear caliper piston retracts clockwise.

Using the Brake Caliper Piston Retractor Tool (206-080) and Crankshaft Pulley/Damper Remover (303-588), Or a universal brake retract/rotate tool ..fully retract the rear brake caliper piston into the caliper housing. See Fig. 64


https://www.2carpros.com/forum/automotive_pictures/266999_jag_88.jpg


Install the rear brake pads
NOTE:Make sure the piston location mark is in the correct position so that the locator pin on the brake pad backing plate locates correctly into the piston.

Using NEW caliper retaining bolts, install the rear brake caliper. Tighten rear caliper retaining bolts to specification. See TORQUE SPECIFICATIONS
Install the parking brake cable to rear brake caliper.
On vehicles with manually adjusted parking brakes, install parking brake cable retaining clip.
On vehicles with self-adjusting parking brakes, ensure that retaining tabs secure the parking brake cable housing.
Release the tension on the parking brake cable by moving the parking brake caliper lever away from the cable end. Install cable to parking brake cable lever.
Install rear wheels. Install lug nuts and tighten to specification. See TORQUE SPECIFICATIONS . Lower vehicle.
Ensure that brake fluid level is at the MAX mark on reservoir.
Start the engine and repeatedly press the brake pedal until brake pressure is evident. Top off brake fluid as necessary, bringing fluid level to the MAX mark. If necessary, check parking brake adjustment. See PARKING BRAKE under ADJUSTMENTS.
Remove paint work protection covers, and close engine compartment hood.

Hope this helps


https://www.2carpros.com/forum/automotive_pictures/266999_AAA2_1077.png

Was this
answer
helpful?
Yes
No
Sunday, May 23rd, 2021 AT 12:59 PM (Merged)
Tiny
DAVIDDIAZ3971
  • MEMBER
  • 3 POSTS
  • 2004 JAGUAR X-TYPE
  • 6 CYL
  • AWD
  • AUTOMATIC
  • 61,000 MILES
How do you change rear brake pads. Do I need a reset tool and if I do how to use it including which wsy rotation
Was this
answer
helpful?
Yes
No
Sunday, May 23rd, 2021 AT 12:59 PM (Merged)
Tiny
DAVE H
  • MECHANIC
  • 13,383 POSTS
Hello .. thanks for the doantion .. much appreciated

You can buy a generic brake tool from most autoparts stores

REAR DISC BRAKE PADS
WARNING:Brake dust, if inhaled can damage your health. Always remove brake dust using a vacuum brush. Do not use a compressed air line to disperse brake dust into the atmosphere.

NOTE:Special tools required: Brake Caliper Piston Retractor Tool (206-080) and Crankshaft Pulley/Damper Remover (303-588). See Fig. 68 and Fig. 69 .
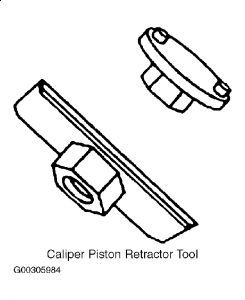
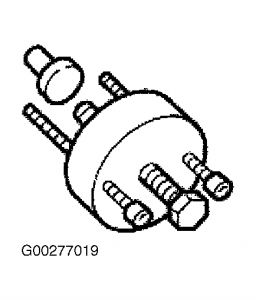
https://www.2carpros.com/forum/automotive_pictures/266999_jag_90.jpg


https://www.2carpros.com/forum/automotive_pictures/266999_jag2_5.jpg


NOTE:Brake pads must always be replaced in axle sets.

Removal
Open engine compartment hood and fit paint protection covers to fenders. Raise and support vehicle. Remove rear wheels.
Release the tension on the parking brake cable by moving the parking brake caliper lever away from the cable end. Remove cable from parking brake cable lever. See Fig. 32 .
Remove the parking brake cable from the rear brake caliper.
On vehicles with manually adjusted parking brakes, remove the retaining clip. See Fig. 33 .
On vehicles with self-adjusting parking brakes, release the tabs on the parking brake cable housing. See Fig. 38 .
Remove and discard the rear brake caliper retaining bolts. See Fig. 62 . Remove the rear brake caliper and secure to one side.
Remove the rear brake pads. See Fig. 63 .
Clean and inspect caliper and all associated parts.

Installation

CAUTION:Retracting the caliper piston may cause the fluid reservoir to overflow. Remove brake fluid spillage immediately from paint work with clean water.

NOTE:The left rear brake caliper piston retracts counterclockwise and the right rear caliper piston retracts clockwise.

Using the Brake Caliper Piston Retractor Tool (206-080) and Crankshaft Pulley/Damper Remover (303-588), fully retract the rear brake caliper piston into the caliper housing. See Fig. 64 .
Install the rear brake pads. See Fig. 63 .
NOTE:Make sure the piston location mark is in the correct position so that the locator pin on the brake pad backing plate locates correctly into the piston.

Using NEW caliper retaining bolts, install the rear brake caliper. See Fig. 62 . Tighten rear caliper retaining bolts to specification. See TORQUE SPECIFICATIONS
Install the parking brake cable to rear brake caliper.
On vehicles with manually adjusted parking brakes, install parking brake cable retaining clip.
On vehicles with self-adjusting parking brakes, ensure that retaining tabs secure the parking brake cable housing.
Release the tension on the parking brake cable by moving the parking brake caliper lever away from the cable end. Install cable to parking brake cable lever.
Install rear wheels. Install lug nuts and tighten to specification. See TORQUE SPECIFICATIONS . Lower vehicle.
Ensure that brake fluid level is at the MAX mark on reservoir.
Start the engine and repeatedly press the brake pedal until brake pressure is evident. Top off brake fluid as necessary, bringing fluid level to the MAX mark. If necessary, check parking brake adjustment. See PARKING BRAKE under ADJUSTMENTS.
Remove paint work protection covers, and close engine compartment hood.
Fig. 62: Removing & Installing Rear Brake Caliper
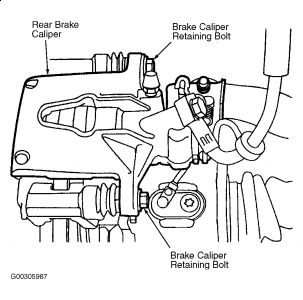

https://www.2carpros.com/forum/automotive_pictures/266999_jag_91.jpg


Fig. 63: Removing & Installing Rear Brake Pads


https://www.2carpros.com/forum/automotive_pictures/266999_jag2_6.jpg


Fig. 64: Retracting Rear Brake Caliper Piston
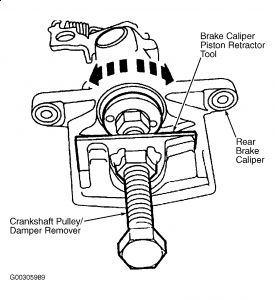

https://www.2carpros.com/forum/automotive_pictures/266999_jag3_1.jpg


Hope this helps


https://www.2carpros.com/forum/automotive_pictures/266999_AAA2_1080.png

Was this
answer
helpful?
Yes
No
Sunday, May 23rd, 2021 AT 12:59 PM (Merged)
Tiny
DEANWICKER
  • MEMBER
  • 3 POSTS
After replacing the rear calipers and pads my brakes were locking up. I'm a Quality Engineer so I was determined to understand. After a lot of experimenting I ended up with the booster and master cylinder.
The master cylinder was opened up and it's aluminum with a sliding plunger AND check valve. The check valve needs to touch a pin and only has about 3/16" travel. (You can actually remove the reservoir, small disk and fluid to see the check valve touch the pin. But I did this only after removal and reinstall onto the car.)
Why was my check valve not touching the pin? Since my car has about 120K the springs in the master and /or booster had gotten weak and the booster was barely keeping the check valve from actuating. Vacuum moves the check valve away from the trigger pin when the car runs and if you don't spring back the check valve stays shut thus locking the brakes.
You are in luck. The booster plunger can be adjusted by pressing the brake to extend it while the master is removed. (A 24" board between the seat and pedal help!)I used vice grips to hold on part of it and a wrench to adjust it. They appear to be glued together but I won. Perhaps my small torch helped. After adjusting as far as possible everything was back to normal -- almost. Once the brakes worked again the switch on the brake pedal was not contacting. This was fixed McGiver style with some stick on spacer(s) to trigger the brake pedal switch.
Why did changing pads cause a new problem of wheel locking up? My guess is there was some air in the lines that was eliminated during caliper bleeding.
Good luck to ya.
Was this
answer
helpful?
Yes
No
Sunday, May 23rd, 2021 AT 12:59 PM (Merged)
Please login or register to post a reply.

Sponsored links