Hi wibevie,
DTC 9: A PROBLEM IN THE AIR MIX CONTROL LINKAGE, DOOR, OR MOTOR
1. Test the air mix control motor (see Air Mix Control Motor Test ).
Is the air mix control motor OK?
YES - Substitute a known-good heater control panel, and recheck. If the symptom/indication goes away, replace the original heater control panel.
NO - Go to step 2.
2. Remove the air mix control motor (see Air Mix Control Motor Replacement ).
3. Check the air mix control linkage and door for smooth movement.
Do the air mix control linkage and door move smoothly?
YES - Replace the air mix control motor.
NO - Repair the air mix control linkage or door.
AIR MIX CONTROL MOTOR TEST
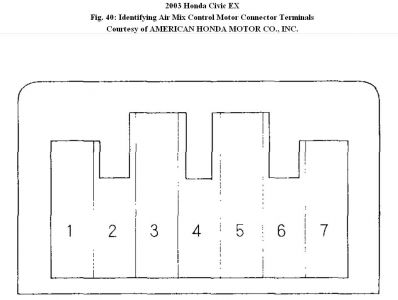
1. Disconnect the 7P connector from the air mix control motor.
NOTE:
Incorrectly applying power and ground to the air mix control motor will damage it. Follow the instructions carefully.
2. Connect battery power to the No. 1 terminal of the air mix control motor, and ground the No. 2 terminal; the air mix control motor should run, and stop at Max Hot. If it doesn't, reverse the connections; the air mix control motor should run, and stop at Max Cool.
3. If the air mix control motor did not run in step 2, remove it, then check the air mix control linkage and door for smooth movement.
"Â If the linkage and door move smoothly, replace the air mix control motor.
"Â If the linkage or door stick or bind, repair them as needed.
"Â If the air mix control motor runs smoothly, go to step 4.

4. Measure the resistance between the No. 5 and No. 7 terminals. It should be between 4.2 to 7.8 kohm.
5. Reconnect the air mix control motor 7P connector, then turn the ignition switch ON (II).
6. Using the backprobe set, measure the voltage between the No. 3 and No. 7 terminals.
Max Cool-about 1 V
Max Hot-about 4 V
7. If either the resistance or voltage readings are not as specified, replace the air mix control motor.
AIR MIX CONTROL MOTOR REPLACEMENT
1. Remove the under-dash fuse/relay box.
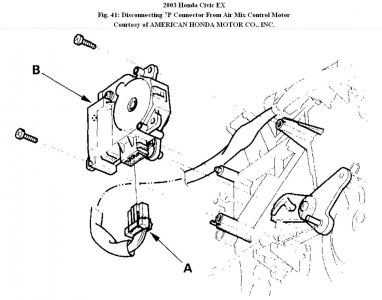
2. Disconnect the 7P connector (A) from the air mix control motor (B). Remove the self-tapping screws and the air mix control motor from the heater unit.

3. Install the motor in the reverse order of removal. Make sure the pin on the motor is properly engaged with the linkage. After installation, make sure the motor runs smoothly.
SPONSORED LINKS
Thursday, September 23rd, 2010 AT 10:57 AM


