***This is a common problem with Accords, especially ones that is driven around the snow-belt area. The EVAP system can often corrode causing the check engine light to go on. As your vehicle has out of warranty for a long time, I highly doubt that the warranty appies to you, but hey, it doesn't hurt to ask. It is a well-known defect/malfunction. You have to order the parts from Honda anyway (no aftermarket parts store carries the part). I included a partial description of the Technical Service Bulletin provided by Honda.***
MIL COMES ON WITH DTC P1457
TECHNICAL SERVICE BULLETIN
Reference Number(s): 01-011, Date of Issue: June 26, 2001
Superceded Bulletin(s): 01-011, Date of Issue: March 6, 2001
Related Ref Number(s): 01-011
ARTICLE BEGINNING
SYMPTOM
The MIL is on, and DTC P1457 [leak detected in EVAP control system (EVAP control canister system)] is set.
PROBABLE CAUSES
The symptom could be the result of any of these causes:
An EVAP system component fails.
The PCM does a diagnostic test on the EVAP system before the primary heated oxygen sensor
(HO2S) is active. If this happens on two consecutive driving cycles, the MIL comes on and DTC P1457 falsely sets.
The EVAP system depends on operation of the EVAP control canister vent shut valve for the
diagnostic self-test. If the valve does not function properly, the MIL comes on and DTC P1457
sets. This condition can occur with vehicles normally driven in any of the states listed in the "Applies To" heading. Failure of this components does not affect the performance of the EVAP system.
VEHICLES AFFECTED
PCM Failure:
1998-99 Accord - L4 models with A/T
EVAP Control Canister Vent Shut Valve Failure:
1998-99 Accord - All models normally driven in any of theses states: Illinois, Indiana, Iowa, Maine, Massachusetts, Michigan, Minnesota, New Hampshire, New York, North Dakota, Ohio, Pennsylvania, Vermont, or Wisconsin
CORRECTIVE ACTION
HONDA: 1998-99 Accord
CATEGORY: Fuel/Emission
APPLIES TO: 1998-99 Accord - See VEHICLES AFFECTED
NOTE: Supersedes 01-011, dated March 6, 2001
MIL COMES ON WITH DTC P1457
Retrieve the DTC with the PGM Tester, and review the Freeze Data. Depending on whether the
feedback condition of the primary HO2S reads "open" or "closed," take the appropriate action
described in DIAGNOSIS.
PARTS INFORMATION
1998 Accord L4 LX (KL) PCM : P/N 37820-PAA-L50, H/C 6286363
1998-99 Accord L4 LX/EX (KA) PCM: P/N 37820-PAA-L50, H/C 62863.63
1998-99 Accord L4 DX (KA) PCM: P/N 37820-PAB-A60, H/C 6286389
1998-99 Accord L4 DX (KL) PCM: P/N 37820-PAB-L60, H/C 6286405
1998 Accord L4 EX (KL) PCM: P/N 37820-PAA-L80, H/C 6286421
1999 Accord L4 LX/EX (KL) PCM: P/N 37820-PAA-L80, H/C 6286421
1998-99 Accord (KA/KL) EVAP Control Canister Vent Shut Valve: P/N 17310-S0X-A02, H/C
6197370
WARRANTY CLAIM INFORMATION
In warranty: The normal warranty applies.
WARRANTY CLAIM INFORMATION
Failed Parts: P/N 37820-PAA-L73
H/C 5859889
Defect Code: 032
Contention Code: B03
Skill Level: Repair Technician
Out of Warranty: Any repair performed after warranty expiration may be eligible for goodwill
consideration by the District Service Manager or your Zone Office. You must request consideration,
and get a decision, before starting work.
Use the PGM Tester, with SN122P or later software, to retrieve the DTC. Check the primary HO2S
feedback condition. Data will be displayed as "open" or "closed".
If the primary HO2S feedback condition reads "closed" refer to S/B 99-074, Diagnosing DTC
P1456 and DTC P1457, and if appropriate, to S/B 99-075, Troubleshooting DTC P1457, both filed under Fuel and Emissions. Make any needed repairs. If the vehicle is normally driven in any of the states listed in the "Applies To" heading, also go to REPAIR PROCEDURE B, and replace the EVAP control canister vent shut valve.
If the primary HO2S feedback condition reads "open", go to REPAIR PROCEDURE A, and replace the PCM. If the vehicle is normally driven in any of the states listed in the "Applies To" heading, also go to REPAIR PROCEDURE B, and replace the EVAP control canister vent shut valve.
REPAIR PROCEDURE A
1998-99 ACCORD L4 (MODELS WITH A/T)
1. EX models only: Make sure you have the anti-theft code for the radio.
2. Write down your customer's radio station presets.
3. Disconnect the negative cable from the battery.
4. Remove and discard the PCM.
5. Install the appropriate new PCM.
6. Reconnect the negative battery cable.
7. EX models only: Enter the anti-theft code for the radio.
8. Enter your customer's radio station presets. Reset the clock.
9. Store the immobilizer system key codes in the PCM with the PGM Tester; see Service Bulletin 00-049, Immobilizer System (Type 2), filed under Body Electrical.
PROCEDURE B
1998-99 ACCORD (MODELS NORMALLY DRIVEN IN ANY OF THE STATES LISTEN IN "APPLIES TO" HEADING)
1. Raise the vehicle on a lift.
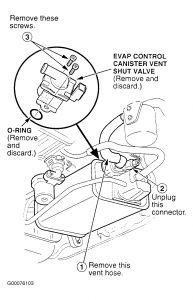
2. Remove and discard the EVAP control canister vent shut valve and O-ring. See Fig. 2 .
3. Install the new vent shut valve and O-ring.
4. Lower the vehicle.
Fig. 2: Removing EVAP Control Canister Vent Shut Valve

Wednesday, January 7th, 2009 AT 10:39 PM


