Good morning,
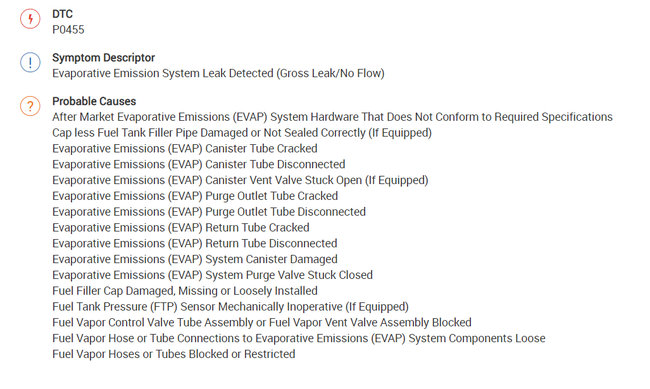
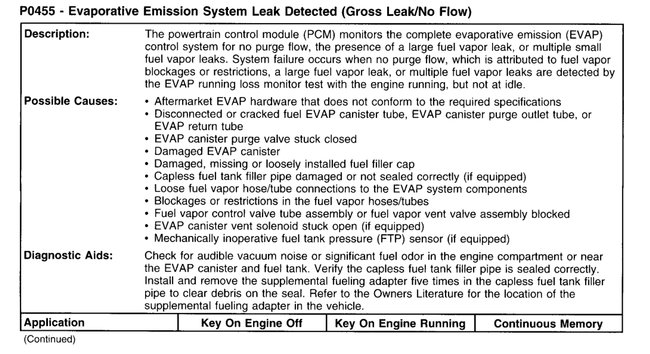
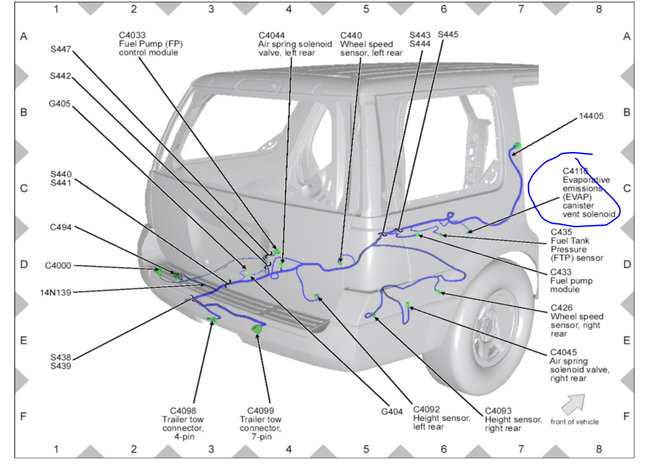
I found found several times the vent solenoid sticks open and does not close for the self test. I attached the possibilities for the code and the procedure for replacing the solenoid below.
https://www.2carpros.com/articles/how-emission-control-systems-work
https://www.2carpros.com/articles/evap-system-code-repair
Roy
Evaporative Emission Canister Vent Solenoid
Removal and Installation
WARNING: Always disconnect the battery ground cable at the battery when working on an evaporative emission (EVAP) system or fuel-related component. Highly flammable mixtures are always present and may be ignited. Failure to follow these instructions may result in serious personal injury.
WARNING: Do not smoke, carry lighted tobacco or have an open flame of any type when working on or near any fuel-related component. Highly flammable mixtures are always present and may be ignited. Failure to follow these instructions may result in serious personal injury.
NOTE: The Evaporative Emission (EVAP) canister vent solenoid and dust separator are an assembly.
1. With the vehicle in NEUTRAL, position it on a hoist. For additional information, refer to Jacking and Lifting See: Vehicle Lifting > Procedures > Jacking and Lifting.
2. Disconnect the battery ground cable. For additional information, refer to Battery, Mounting and Cables See: Battery > Removal and Replacement > Battery Disconnect.
3. Disconnect the EVAP canister vent solenoid electrical jumper from the wiring harness.
4. Disconnect the Fuel Tank Pressure (FTP) sensor and vapor tube assembly-to-EVAP canister quick connect coupling. For additional information, refer to Fuel System - General Information See: Fuel Line Coupler > Removal and Replacement > Quick Connect Coupling.
5. Disconnect the EVAP canister purge valve vapor tube-to-EVAP canister quick connect coupling. For additional information, refer to Fuel System - General Information See: Fuel Line Coupler > Removal and Replacement > Quick Connect Coupling.
6. Disconnect the fresh air tube-to-canister vent solenoid and dust separator assembly quick connect coupling. For additional information, refer to Fuel System - General Information See: Fuel Line Coupler > Removal and Replacement > Quick Connect Coupling.
7. Remove the EVAP canister assembly bracket-to-frame rail bolt in the rear.
- To install, tighten to 20 Nm (177 lb-in).
8. Remove the EVAP canister assembly bracket-to-frame rail bolt in the front.
- To install, tighten to 20 Nm (177 lb-in).
9. Remove the EVAP canister assembly bracket and exhaust Y-pipe dual catalytic converter heat shield-to-transmission crossmember bolt and remove the EVAP canister assembly from the vehicle.
- To install, tighten to 20 Nm (177 lb-in).
10. Disconnect the EVAP canister vent solenoid electrical connector.
11. Remove the 2 EVAP canister-to-EVAP canister assembly bracket bolts in the front of the canister.
- To install, tighten to 6 Nm (53 lb-in).
12. Remove the canister vent solenoid and dust separator assembly from the EVAP canister.
13. To install, reverse the removal procedure.
- Carry out the Evaporative Emission System Leak Test. For additional information, refer to Evaporative Emission System Leak Test See: Evaporative Emissions System > Component Tests and General Diagnostics > Evaporative Emission System Leak Test.
Images (Click to make bigger)
Thursday, February 11th, 2021 AT 7:21 AM


