Engine shutting off erratically

Tiny
KICKOFF877
  • MEMBER
  • 2001 PONTIAC BONNEVILLE
  • 3.8L
  • 6 CYL
  • 2WD
  • AUTOMATIC
  • 324,000 MILES
There is a lot of "you shouldn't do that"'s in here, please don't be shocked.

I rear-ended a car recently which cause some "cosmetic" damage to the front of the car, headlights, grille, things like that.

It also broke the radiator, fans and condenser. Because of where the car was I had to drive it off the road with the coolant pouring out, and it eventually overheated and shut off. It's done this a few times when a hose or radiator broke before. As before, I waited a minute or two and it started right back up until I got it home about 2-3 miles from the crash.

I replaced the radiator and broken parts and added coolant, but didn't bleed the system (yet). I turned it on, ran a few minutes, no problems.

The next morning I tried driving it to a body shop and it didn't make it 200 feet when the engine just shut off, no sputtering, no noise, no overheating, the radiator cap was cool enough to touch. I tried starting it and it turned over but did not start, just made like clanking noises as it tried to start. I read codes and the only one was a P0481 for the cooling fan. I pushed it back up the driveway, and then 15 minutes later it started again as normal, no new codes. Later that afternoon, I added a couple of quarts of oil, drove it around the block a couple of times, no problem.

Next morning I tried to go to the body shop again, made it over halfway there, still no codes aside from the fan, no overheating, car was driving normal, and again, engine shuts off. I was on a hill, so I rolled down to a spot out of the way, tried to add coolant just in case, but the radiator was full, so I added some to the empty overflow tank. Radiator cap was just warm.

After about 20 minutes I was resigned to having to push it again, but then it started, no new codes, no overheating, no weird anything. Then about 5 blocks later it shut off again. I got pushed the rest of the way to the body shop and about 5 minutes later it started again enough to get it in the shop then I turned it off.

I'm pretty sure the pump cavitated, but there is no coolant leaks right now. There was some brass looking shavings (powder looking stuff) in the coolant which makes me think the pump may be bad.


Any suggestions?

I thought maybe there may not be enough coolant to reach/trigger the sensor to show it overheating and maybe the engine overheating then cooling enough to allow it to start again. After shutting off, there is a noise inside the upper intake manifold which sounds like water boiling. I know there is a pipe in there which carries water that's why I think the engine might be overheating without the sensor picking up all the temperature.

Friday, March 6th, 2020 AT 1:47 PM
1 Reply

Tiny
JACOBANDNICKOLAS
  • MECHANIC
  • 109,747 POSTS
Hi,

As far as possibly overheating, is the temp gauge working at all? Based on your description, it sounds like a bad crankshaft position sensor. The easiest way to check is with a live data scanner. If it is the sensor, you will lose the RPM signal when cranking. Or, you could check to see if you lost spark to the plugs.

Take a look through these two links. The first explains how one works and the second discusses symptoms of a bad one. See if what you experience seems to mirror what is listed.

https://www.2carpros.com/articles/how-a-crank-shaft-angle-sensor-works

https://www.2carpros.com/articles/symptoms-of-a-bad-crankshaft-sensor

Now, if you find it mirrors what is experienced and you check and note that either spark or an RPM signal is lost, there is where I would start. Here is a link that shows in general how one is replaced:

https://www.2carpros.com/articles/crankshaft-angle-sensor-replacement

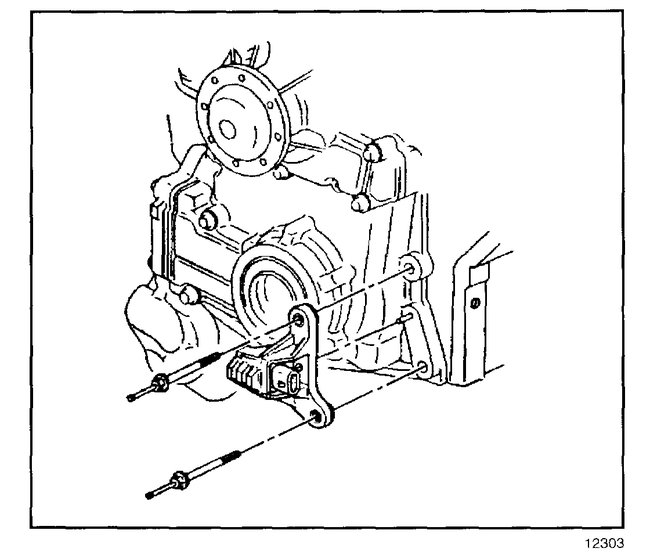
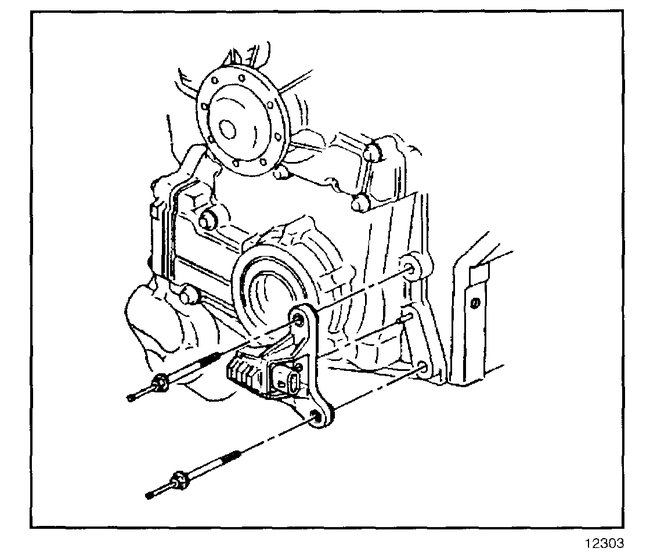
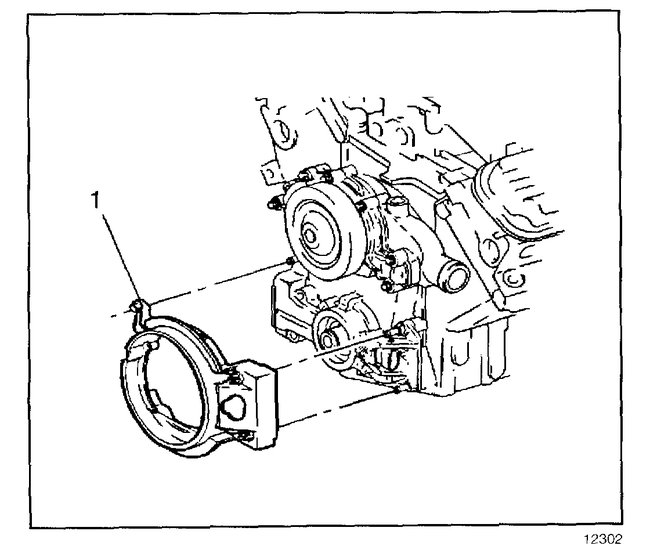
Here are directions specific to your vehicle. The attached pics correlate with the directions.

2001 Pontiac Bonneville V6-3.8L SC VIN 1
Crankshaft Position (CKP) Sensor Replacement
Vehicle Powertrain Management Sensors and Switches - Powertrain Management Sensors and Switches - Computers and Control Systems Crankshaft Position Sensor Service and Repair Procedures Crankshaft Position (CKP) Sensor Replacement
CRANKSHAFT POSITION (CKP) SENSOR REPLACEMENT
REMOVAL PROCEDURE

CAUTION: Refer to Battery Disconnect Caution in Service Precautions.

pic 1

1. Disconnect the negative battery cable.
2. Raise the vehicle on a hoist. Refer to Lifting and Jacking the Vehicle.
3. Remove the right inner fender access cover.
4. Remove the crankshaft harmonic balancer. Refer to Crankshaft Balancer Replacement in Engine-3.8L.
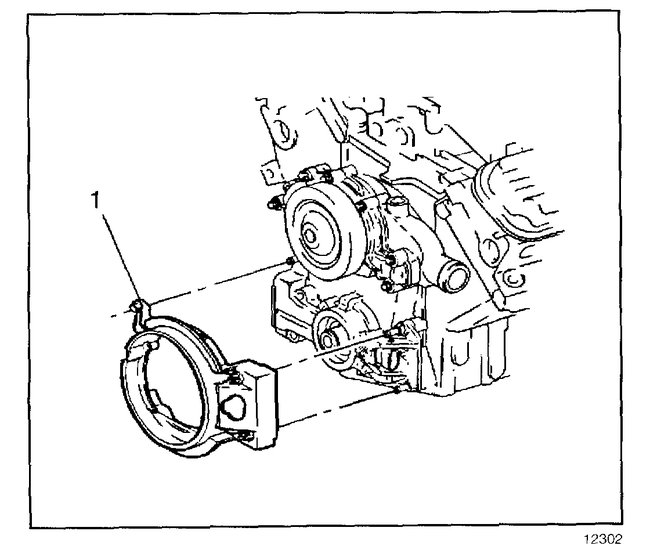
5. Remove the crankshaft position sensor (CKP) shield (1). Do Not use a pry bar.
6. Disconnect the sensor electrical connector.

pic 2

7. Remove 2 attaching bolts from the CKP sensor.
8. Remove the CKP sensor from block face.

INSTALLATION PROCEDURE

pic 3

1. Position the CKP sensor to the block.

NOTE: Refer to Fastener Notice in Service Precautions.

2. Install the bolts that hold the CKP sensor to the block face.

Tighten
Tighten the bolts to 30 N.m (22 lb ft).

pic 4

3. Install the CKP sensor shield (1).
4. Connect the CKP sensor electrical connector.
5. Position the crankshaft harmonic balancer On the crankshaft. Refer to Crankshaft Balancer Replacement in Engine-3.8L.
6. Install the right inner fender access cover.
7. Lower the vehicle.
8. Connect the negative battery cable.
9. Perform the Crankshaft Variation Learn Procedure. Refer to CKP System Variation Learn Procedure. See: Vehicle > Programming and Relearning

___________________

Also, if you want to check for spark, here is a link that shows how to do it.

https://www.2carpros.com/articles/how-to-test-an-ignition-system

_____________________

Here are the directions for refilling the coolant.

1. Fill the radiator and the coolant reservoir (to the full cold line) with GM Goodwrench DEX-COOL (R) or Havoline DEX-COOL (R). To ensure sufficient engine cooling, freezing and corrosion protection, maintain the protection level at -37°C (-34°F) lower
2. Wait for two minutes and recheck the level of the coolant in the radiator. If necessary, add coolant to radiator until the coolant level is at the base of the radiator fill neck.
3. Install the radiator pressure cap, making sure the arrows on the cap line up with the coolant recovery tube.
4. Place the heater and A/C control in any A/C mode except Max. and the temperature in the highest setting.
5. Start the engine and allow to idle until the lower radiator to coolant pump hose is hot.
6. Cycle the engine speed up to about 3000 RPM and back to idle five times. Slowly open the bleed valve on the top of the thermostat housing for approximately 15 seconds to expel any trapped air in the cooling system.
7. Close the air bleed valve. Do not over tighten.
8. Allow the engine to cool to outside temperature. Ensure the coolant level in the reservoir and the radiator are at the proper levels.

____________________________

Let me know if this helps.

Take care,
Joe
Was this
answer
helpful?
Yes
No
Friday, March 6th, 2020 AT 9:06 PM

Please login or register to post a reply.

Sponsored links