Hi,
It is located at the top of the top of the HVAC housing. It is electric. Here are the directions. However, before you do this, check something. With the engine warm, running, and the heater on high, feel both heater core hoses to confirm both are hot. If they are, then it is most likely the actuator. If one is hot and the other isn't, the core may be plugged.
____________________________________
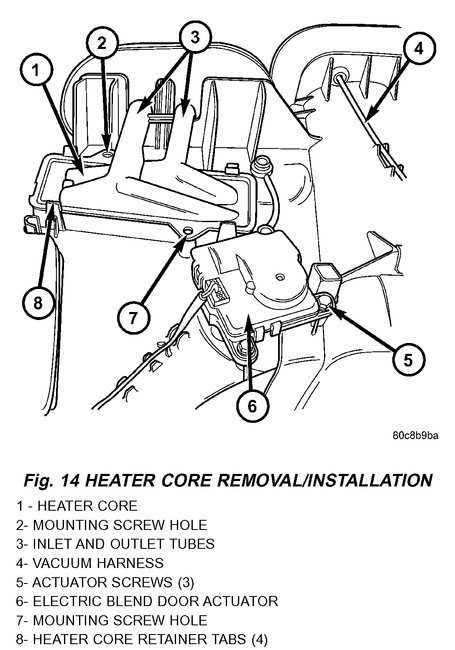
Here are the directions as listed from Alldata. There are other components which are actuated by vacuum. However, these directions indicate the blend air door actuator to be electric. The attached picture correlates with the directions
__________________________________
2003 Jeep Truck Liberty 4WD V6-3.7L VIN K
Blend Door Actuator Replacement
Vehicle Heating and Air Conditioning Air Door Actuator / Motor Service and Repair Procedures Blend Door Actuator Replacement
Blend door actuator replacement
WARNING: On vehicles equipped with airbags, disable the airbag system before attempting any steering wheel, steering column, or instrument panel component diagnosis or service. Disconnect and isolate the battery negative (ground) cable, then wait two minutes for the airbag system capacitor to discharge before performing further diagnosis or service. This is the only sure way to disable the airbag system. Failure to take the proper precautions could result in an accidental airbag deployment and possible personal injury.
1. Disconnect and isolate the battery negative cable.
2. Remove A/C housing from vehicle.
Fig.14 Heater Core Removal/Installation
Pic 1
3. Remove the screws that secure the blend door actuator to the top of the HVAC housing.
4. Remove the blend door actuator.
INSTALLATION
1. Install the blend door actuator in place.
2. Install and tighten the screws that secure the blend door actuator to the housing. Tighten the mounting screws to 2.4 (± 0.34) Nm (21 (± 3) in. Lbs.).
3. Install the HVAC housing into the vehicle.
4. Install the blend door actuator electrical connector from the wiring harness through the glove box.
5. Connect the battery negative cable.
_______________________________
Let me know if this helps.
Joe
Image (Click to make bigger)
Sunday, January 12th, 2020 AT 10:03 PM


