WITHOUT AIR CONDITIONING
REMOVAL:
Disconnect the negative battery cable. Drain the coolant.
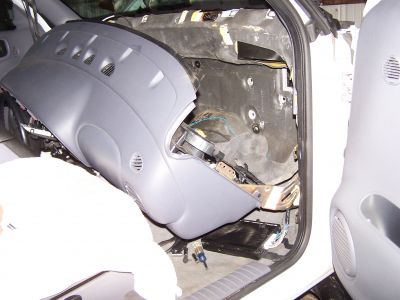
Remove the steering column cover, intermittent wiper control, if equipped and the lower instrument panel module retaining screw to the right of the steering column.
Remove the center distribution duct retaining screws and panel support screw at the bottom of the module.
Remove the courtesy lamp at the lower right corner of the module and the screw near the ash receiver.
Open the glovebox and remove the screws along the top edge.
Move the module out and down far enough to unclip the wiring harness and antenna cable and disconnect the speaker wire (if equipped with monaural radio) and glovebox light wire. Remove the module from the vehicle.
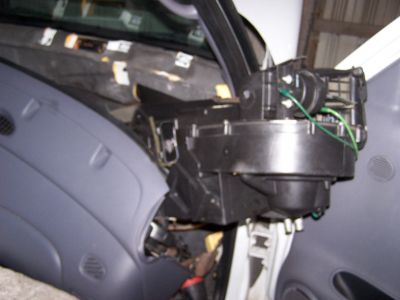
Remove the center air distribution duct.
Remove the antenna wire from retaining clip at the right end of the heater unit.
Disconnect the blower motor connector and remove the thermal insulator retainer from the heater unit.
Disconnect the demister hoses from the adaptor at the top of the heater unit.
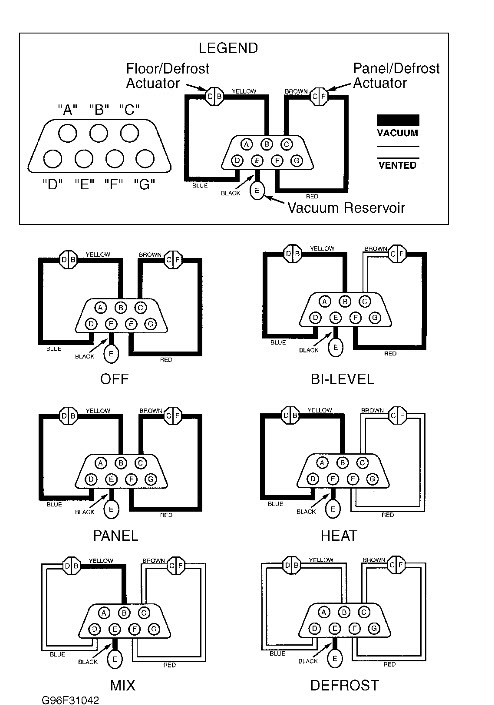
Disconnect the vacuum feed line from the check valve.
Disconnect the temperature control cable flag retainer from the heater unit.
Remove the adjusting clip from the blend air door crank.
Disconnect the heater hoses from the core tubes and plug them.
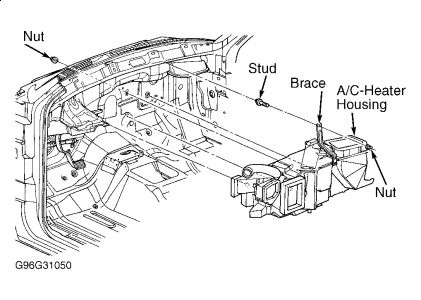
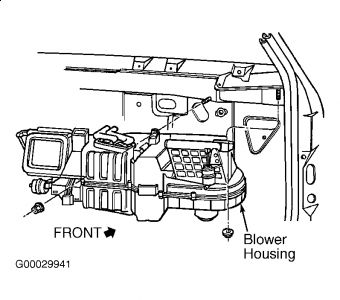
Remove the four heater unit attaching nuts from the rear engine compartment dash panel.
Remove the heater unit support attaching screw and rotate the brace out of the way.
Remove the heater unit from the vehicle.
To disassemble the housing assembly, vacuum diaphragm and retaining screws from the cover and remove the cover.
Remove the retaining screw from the heater core and remove the core from the housing assembly.
INSTALLATION:
Remove the temperature control door from the unit and clean the unit out with solvent. Lubricate the lower pivot rod and its well and install. Wrap the heater core with foam tape and place it in position. Secure it with its screw.
Assemble the unit, making sure all vacuum tubing is properly routed.
Install the assembly to the vehicle and connect the vacuum harness. Install the nuts to the firewall. Install the support brace to the heater unit.
Connect the demister hoses to the adaptor at the top of the heater unit.
Connect the blower motor connector and install the thermal insulator retainer to the heater unit.
Connect the vacuum feed line to the check valve.
Connect the temperature control cable flag retainer to the heater unit and install the adjusting clip from the blend air door crank.
Install the center air distribution duct.
Install the antenna wire from retaining clip at the right end of the heater unit.
Install the instrument panel module and all related parts.
Connect the heater hoses to the core tubes.
Fill the cooling system.
Connect the negative battery cable and check the heater for proper operation and leakage.
WITH AIR CONDITIONING
REMOVAL:
Disconnect the negative battery cable. Properly discharge the air conditioning system. Drain the coolant.
Remove the steering column cover, intermittent wiper control and the lower instrument panel module retaining screw to the right of the steering column.
Remove the center distribution duct retaining screws and panel support screw at the bottom of the module.
Remove the courtesy lamp at the lower right corner of the module and the screw near the ash receiver.
Open the glovebox and remove the screws along the top edge.
Move the module out and down far enough to unclip the wiring harness and antenna cable and disconnect the speaker wire (if equipped with monaural radio) and glovebox light wire. Remove the module from the vehicle.
Remove the center air distribution duct.
Remove the antenna wire from retaining clip at the right end of the heater unit.
Disconnect the blower motor connector and remove the thermal insulator retainer from the heater unit.
Disconnect the demister hoses from the adaptor at the top of the heater unit.
Disconnect the vacuum harness connector from the air conditioning control hose and vacuum feed line from the check valve.
Disconnect the temperature control cable flag retainer from the heater unit and remove the adjusting clip from the blend air door crank.
Disconnect the heater hoses from the core tubes and plug them.
Remove the condensation drain tube.
Remove the 4 heater/air conditioning unit attaching nuts from the rear engine compartment dash panel.
Remove the heater/air conditioning unit support attaching screw and rotate the brace out of the way.
Remove the heater/air conditioning unit from the vehicle.
To disassemble the housing assembly, vacuum diaphragm and retaining screws from the cover and remove the cover.
Remove the retaining screw from the heater core and remove the core from the housing assembly.
INSTALLATION:
Remove the temperature control door from the unit and clean the unit out with solvent. Lubricate the lower pivot rod and its well and install. Wrap the heater core with foam tape and place it in position. Secure it with its screw.
Assemble the unit, making sure all vacuum tubing is properly routed.
Install the assembly to the vehicle and connect the vacuum harness. Install the nuts to the firewall and install the condensation tube. Install the support brace to the heater/air conditioning unit.
Connect the demister hoses to the adaptor at the top of the heater unit.
Connect the blower motor connector and install the thermal insulator retainer to the heater unit.
Connect the vacuum harness connector to the air conditioning control hose and vacuum feed line to the check valve.
Connect the temperature control cable flag retainer to the heater unit and install the adjusting clip from the blend air door crank.
Install the center air distribution duct.
Install the antenna wire from retaining clip at the right end of the heater unit.
Install the instrument panel module and all related parts.
Connect the heater hoses to the core tubes.
Using new gaskets, install the H-valve and connect the hose connection at the valve.
Evacuate and recharge the air conditioning system.
Fill the cooling system.
Connect the negative battery cable and check the entire climate control system for proper operation and leakage.
Thanks for using 2CarPros.com!
Feb 6, 2019 at 2:47 PM
(Merged)