HEATER CORE
Removal
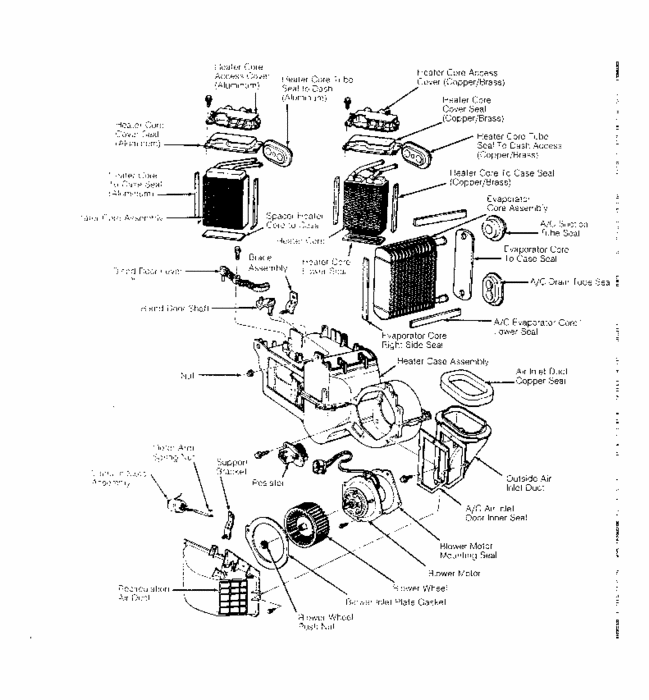
Remove heater/evaporator case. See HEATER/EVAPORATOR CASE. Remove vacuum source line from heater core tube seal. Remove seal from heater core tubes.
Remove heater core access cover screws. See Fig. 5. Remove access cover and seal from heater/evaporator case. Lift heater core and case seals out of heater/evaporator case.
HEATER/EVAPORATOR CASE
Removal
Disconnect negative battery cable. Drain coolant from radiator. Discharge A/C system using approved refrigerant recovery/recycling equipment. Disconnect heater hoses from heater core. Plug heater core tubes or drain coolant by blowing coolant from heater core using low pressure compressed air. Disconnect vacuum supply hose from inside engine compartment.
Disconnect A/C lines from evaporator core. Plug A/C lines and evaporator core tubes. Remove instrument panel. See INSTRUMENT PANEL. Remove instrument panel shake brace to evaporator case bracket screw. Remove shake brace.
Remove floor register and rear floor duct from bottom of heater/evaporator case. Remove nuts securing heater/evaporator case to firewall. Remove 2 screws securing support brackets to cowl top panel. Carefully pull heater/evaporator case away from firewall. Remove heater/evaporator case.
INSTRUMENT PANEL
Removal & Installation
Position wheels in straight-ahead position. Disable air bag system. See AIR BAGS article in the ACCESSORIES/SAFETY EQUIPMENT Section. Disconnect negative battery cable. Remove steering column trim shrouds.
Disconnect all electrical connections from steering column switches. Remove opening cover from under steering column. Remove 2 bolts and reinforcement from under steering column.
Disengage insulator retainer. Remove insulator. Remove 4 nuts and reinforcement below steering column. Remove 4 nuts securing steering column to instrument panel.
Disconnect PRNDL cable (A/T models). Lower steering column onto front seat. At steering column opening, remove one bolt securing instrument panel to brace. Remove one instrument panel brace bolt (below radio area).
Remove sound insulator under glove box by removing 2 push nuts securing insulator to studs on climate control case. Disconnect wires of main wire loom in engine compartment. Disengage rubber grommet from firewall. Feed wiring into passenger compartment through hole in firewall.
Remove right and left kick panels. Disconnect wires from instrument panel at right and left kick panel sides. Remove screws on left and right sides of instrument panel.
Pull up to unsnap right and left speaker opening covers. Remove speaker covers. Release glove box assembly by depressing side of glove box bin and swinging door and bin downward.
Working through steering column and glove box openings, reach under instrument panel and disconnect electrical connectors, vacuum hoses, A/C-heater control panel cables, speedometer cable and radio antenna cable.
Close glove box door. Support instrument panel. Remove 3 screws attaching top of instrument panel to cowl top. Disconnect remaining wires. Remove instrument panel. To install instrument panel, reverse removal procedure.
Image (Click to make bigger)
SPONSORED LINKS
Monday, February 20th, 2012 AT 2:09 AM


