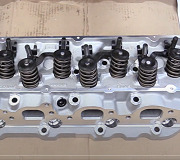
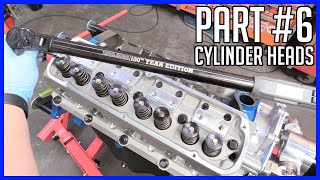
Well first lets put a new head back on there. Heres how to do so..
1.Properly relieve the fuel system pressure, then disconnect the negative battery cable.
2.Drain the engine cooling system.
3.Remove the rocker arm cover.
4.Remove the intake manifold.
5.Remove the exhaust manifold.
6.If removing the right cylinder head, remove or disconnect:
7.Electrical connector at the sensor.
8.Dipstick tube at the cylinder head bracket.
9.Air conditioning compressor (position it aside with the refrigerant lines attached), if equipped.
10.A/C compressor (if equipped)/belt tensioner bracket.
11.If removing the left cylinder head, remove or disconnect:
12.Alternator (position it aside).
13.Left side engine accessory bracket with power steering pump (position the pump aside with the lines attached) and brackets, if equipped.
14.Tag and disconnect the wiring from the spark plugs. If necessary, remove the spark plugs from the cylinder head.
15.Loosen the rocker arms and remove the pushrods.
If valve train components, such as the rocker arms or pushrods, are to be reused, they must be tagged or arranged to insure installation in their original locations.
16.Remove the cylinder head bolts by loosening them in the reverse of the torque sequence, then carefully remove the cylinder head.
To install:
17.Carefully clean and inspect the gasket mounting surfaces.
The gasket surfaces on both the head and block must be clean of any foreign matter and free of nicks or heavy scratches. The cylinder bolt threads in the block and the threads on the bolts must be cleaned (dirt will affect the bolt torque).
DO NOT apply sealer to composition steel-asbestos gaskets.
18.If using a steel only gasket, apply a thin and even coat of sealer to both sides of the gaskets.
19.Place a new gasket over the dowel pins with the bead or the words "This Side Up" facing upwards (as applicable), then carefully lower the cylinder head into position over the gasket and dowels.
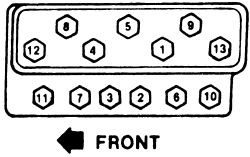
20.Apply a coating of 1052080 or equivalent sealer to the threads of the cylinder head bolts, then thread the bolts into position until finger-tight. Using the proper torque sequence, tighten the bolts in 3 steps:
21.First, tighten the bolts to 25 ft. lbs. (34 Nm).
22.Next, tighten the bolts to 45 ft. lbs. (61 Nm).
23.Finally, tighten the bolts to 65 ft. lbs. (90 Nm).
24.Install the pushrods, secure the rocker arms and adjust the valves.
25.If removed, install the spark plugs. Engage the spark plug wires.
26.If the left cylinder head was removed, reposition and secure the engine accessory bracket with the power steering pump and brackets, as equipped. Install the alternator.
27.If the right cylinder head was removed, install the A/C compressor (if equipped) and A/C compressor/belt tensioner bracket, then install the dipstick tube bracket and engage the sensor electrical connector.
28.Install the exhaust manifold.
29.Install the intake manifold.
30.Install the rocker arm cover.
31.Connect the negative battery cable, then properly refill the engine cooling system.
32.Run the engine to check for leaks, then check and/or adjust the ignition timing.
SPONSORED LINKS
Saturday, January 23rd, 2010 AT 9:57 PM