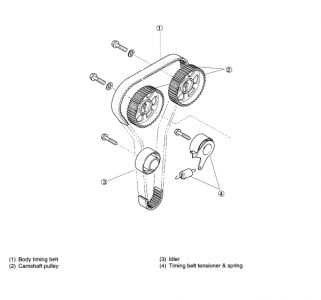
Replaced timing belt and head, car cranks but

Tiny
MACKSHOUSE
  • MEMBER
  • 2004 KIA RIO

I recently replaced the timing belt and head, the car cranks but won't start, what should I check?
Thursday, October 8th, 2009 AT 3:07 PM

25 Replies

Tiny
JACOBANDNICKOLAS
  • MECHANIC
  • 109,700 POSTS
Are you sure the timing was correct when you replaced the belt? Are you getting spark and fuel to the engine?

Let me know.
Was this
answer
helpful?
Yes
No
+2
Monday, October 12th, 2009 AT 8:13 AM
Tiny
MACKSHOUSE
  • MEMBER
  • 2 POSTS
I set the timing by the marks on block and sprockets, I am getting fire at the coil, and the fuel rail is pressured.
Was this
answer
helpful?
Yes
No
+3
Monday, October 12th, 2009 AT 7:36 PM
Tiny
JACOBANDNICKOLAS
  • MECHANIC
  • 109,700 POSTS
Okay, if you are getting spark and fuel to the rail, there are two things left to check. First, I need to know if fuel is making it through the injectors. Therefore, I need you to check for an injector pulse at each injector. (if you want to avoid this, see if it will start with starting fluid) If it does start for a few seconds, that means the timing is right, you have spark, but fuel isn't getting into the engine. Let me know what happens with that test. If it has spark and still doesn't start with starting fluid, recheck the timing, and if you are confident it is correct, I need you to check engine compression. If you have fuel, spark, and the timing correct, it should run unless there isn't enough compression.

Here is a how to for checking compression:

https://www.2carpros.com/dia/how_to_check_compression.htm

Let me know what you find or if you have other questions.

Joe
Was this
answer
helpful?
Yes
No
+1
Monday, October 12th, 2009 AT 10:36 PM
Tiny
JASONMUMBY1234
  • MEMBER
  • 1 POST
  • 2004 KIA RIO
  • 4 CYL
  • 2WD
  • AUTOMATIC
I a just needing a step by step on how to change the timing belt on a 2004 Kia Rio, 1.5 litre automatic please
Was this
answer
helpful?
Yes
No
+1
Saturday, March 30th, 2019 AT 8:01 AM (Merged)
Tiny
KHLOW2008
  • MECHANIC
  • 41,814 POSTS
1. Disconnect negative battery cable...
2. Loosen power steering lock bolts and nuts& accordingly and remove tension from power steering (P/S) and/or air conditioning (A/C) compressor drive belt... 3. Remove P/S and/or A/C drive belt...
4. Loosen generator mounting bolts and adjusting bolt...
5. Remove generator bolts...
6. Remove water pump pulley...
7. Remove crankshaft pulley...
8. Remove upper and lower timing belt covers...
9. Turn crankshaft so that timing mark on timing belt pulley is aligned with timing mark on engine...
10. Check that "I" mark on intake camshaft pulley is aligned with mark on seal plate and "E" mark on exhaust camshaft pulley is aligned with mark on seal plate...
NOTE: Do not move camshaft or crankshaft once timing marks have been correctly positioned...
11. Loosen tensioner pulley lock bolt...
12. Protect timing belt with a rag...
13. Remove tensioner pulley...
14. Remove timing belt...
NOTE: Mark the direction of timing belt rotation (on the timing belt) for proper reinstallation...

INSTALLATION
1. Install tensioner pulley...
NOTE: Replace tensioner spring whenever timing belt is replaced...

2. Pull tensioner pulley to its furthest point and tighten lock bolt...
3. Ck that timing mark on timing belt pulley is aligned with timing mark on engine...
4. Check that "I" mark on intake camshaft pulley is aligned with mark on seal plate and "E" mark on exhaust camshaft pulley is aligned with mark on seal plate...
NOTE: If existing timing belt is being reused, install belt in proper rotation direction marked prior to removal.

5. Install timing belt onto timing belt pulley first, then idler pulley, exhaust camshaft pulley, intake camshaft pulley, and tensioner pulley in that order...
6. Check that there is no looseness in belt between idler pulley and exhaust camshaft pulley or between intake and exhaust camshaft pulleys...
7. Loosen tensioner pulley lock bolt and allow tensioner spring to apply tension to timing belt...
NOTE: Do not add additional tension.

8. Tighten tensioner pulley lock bolt to specified torque. Tightening torque: 28 - 38 ft. Lbs. (38 - 51 Nm, 3.9 - 5.2 kgf-cm)...
9. Rotate crankshaft two full revolutions (clockwise only) and align timing mark on timing belt pulley with timing mark on engine block. ..
10. Check that "I" mark on intake camshaft pulley and "E" mark on exhaust camshaft pulley are aligned with marks on seal plate...
11. If they are not aligned, remove timing belt and start process from tensioner installation...
12. Measure timing belt deflection by applying moderate pressure midway between camshaft pulleys. If deflection is not correct, repeat from tensioner installation. Deflection pressure: 22 lbs. (98 N, 10 kg)...
Deflection: 0.39 - 0.50 inch (11 - 13 mm)...

13. Install lower and upper timing belt covers in that order. Tightening torque: 5.8 - 8.0 ft. Lbs. (7.9 - 10.7 Nm, 0.8 - 1.1 kgf-cm)...
14. Install timing belt guide plate and crankshaft pulley. Tightening torque: 9.0 - 12.6 ft. Lbs. (12.3 - 17.2 Nm, 1.3 - 1.8 kgf-cm)
Install water pump pulley. Tightening torque: 9.0 - 12.6 ft. Lbs. (12.3 - 17.2 Nm, 1.3 - 1.8 kgf-cm)...

16. Install generator belt and adjust the tension. ..

17. Install P/S and/or A/C drive belt and adjust the tension. ..
18. Connect negative battery cable.
Was this
answer
helpful?
Yes
No
+1
Saturday, March 30th, 2019 AT 8:01 AM (Merged)
Tiny
41238
  • MEMBER
  • 1 POST
  • 2001 KIA RIO
Engine Mechanical problem
2001 Kia Rio 4 cyl Front Wheel Drive Automatic

To replace the timing belt, Is it necessary to remove the engine oil pan? Or can I: impact off the harmonic balancer (containing accessory belt pulleys); support the the engine with a wooden cradle; remove the motor mount from the right fender/timing belt end of the engine; remove the plastic covers.

I have already purchased a timing belt and a kit containing springs, a tensioner, and an idler pulley for the new belt.

What else is beneficial to do with this procedure?
Was this
answer
helpful?
Yes
No
Saturday, March 30th, 2019 AT 8:01 AM (Merged)
Tiny
RASMATAZ
  • MECHANIC
  • 75,992 POSTS


https://www.2carpros.com/forum/automotive_pictures/12900_timingbelt1_1.jpg


Removal
1.Disconnect negative battery cable.

https://www.2carpros.com/forum/automotive_pictures/12900_timingbelt2_1.gif


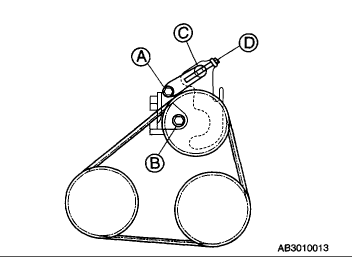
2.Loosen power steering lock bolts and nuts accordingly and remove tension from power steering (P/S) and/or air conditioning (A/C) compressor drive belt.
3.Remove P/S and/or A/C drive belt.
4.Loosen generator mounting bolts and adjusting bolt.
5.Remove generator bolts.
6.Remove water pump pulley.
7.Remove crankshaft pulley and timing belt guide plate.
8.Remove upper and lower timing belt covers.
9.Turn crankshaft so that timing mark on timing belt pulley is aligned with timing mark on engine.

https://www.2carpros.com/forum/automotive_pictures/12900_timingbelt3_1.gif


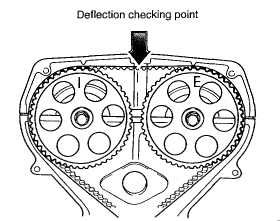
10.Check that "l" mark on intake camshaft pulley is aligned with mark on cylinder head cover and "E" mark on exhaust camshaft pulley is aligned with mark on cylinder head cover. Notice : Do not move camshaft or crankshaft once timing marks have been correctly positioned.

https://www.2carpros.com/forum/automotive_pictures/12900_timingbelt4_1.gif


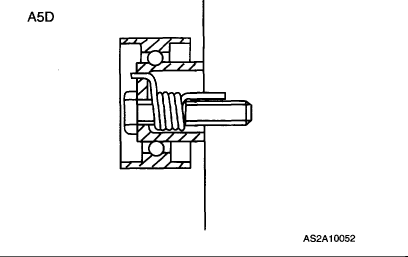
11.Loosen tensioner pulley lock bolt.
12.Protect timing belt with a rag.
13.Remove tensioner pulley.
14.Remove timing belt. Notice: Mark the direction of timing belt rotation (on the timing belt) for proper reinstallation.

Inspection
Notice: Never forcefully twist, turn inside out or bend timing belt. Do not allow oil or grease to come in contact with timing belt.

1.Replace timing belt if it is contaminated with oil or grease.
2.Check timing belt for uneven wear, fraying, peeling, cracking and hardening. Replace timing belt as necessary.
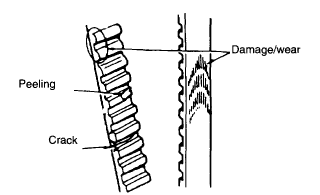

https://www.2carpros.com/forum/automotive_pictures/12900_timingbelt5_1.gif


3.Bend timing belt into a "U" shape as shown in figure. Distance "A" must be at least 1.0 in (25 mm).
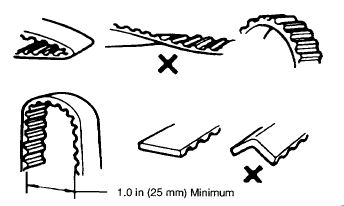

https://www.2carpros.com/forum/automotive_pictures/12900_timingbelt6_1.gif


4.Inspect both idler pulley and tensioner pulley for uneven wear a rid smooth bearing operation.
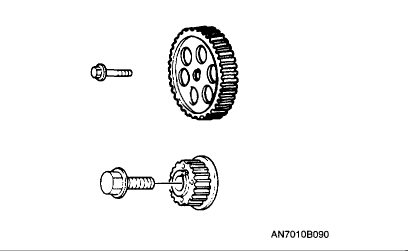

https://www.2carpros.com/forum/automotive_pictures/12900_timingbelt7_1.gif


5.Inspect camshaft pulleys and timing belt pulley for broken teeth or damage. Notice : Replace any component that shows damage, excessive wear, or that appears prone to a possible failure.

Installation
1.Install tensioner pulley. Notice : Replace tensioner spring whenever timing belt is replaced.
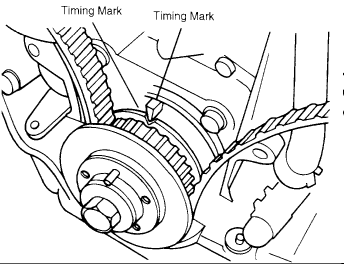

https://www.2carpros.com/forum/automotive_pictures/12900_timingbelt8_1.gif


2.Pull tensioner pulley to its furthest point and tighten lock bolt.
3.Check that timing mark on timing belt pulley is aligned with timing mark on engine.
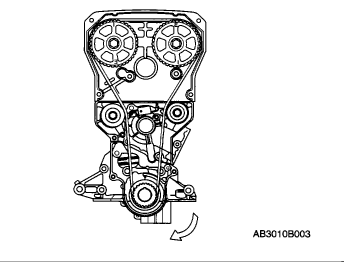

https://www.2carpros.com/forum/automotive_pictures/12900_timingbelt9_1.gif


4.Check that "I" mark on intake camshaft pulley is aligned with mark on cylinder head cover and "E" mark on exhaust camshaft pulley is aligned with mark on cylinder head cover. Notice : If existing timing belt is being reused, install belt in proper rotation direction marked prior to removal.
5.Install timing belt onto timing belt pulley first, then idler pulley, exhaust camshaft pulley, intake camshaft pulley, and tensioner pulley in that order.
6.Check that there is no looseness in belt between idler pulley and exhaust camshaft pulley or between intake and exhaust camshaft pulleys.
7.Loosen tensioner pulley lock bolt and allow tensioner spring to apply tension to timing belt. Notice: Do not add additional tension.
8.Tighten tensioner pulley lock bolt to specified torque. Tightening torque: 28 - 38 ft. lbs. (38 - 51 Nm, 3.9 - 5.2 kg-m)
9.Rotate crankshaft two full revolutions (clockwise only) and align timing mark on timing belt pulley with timing mark on engine block.
10.Check that "I" mark on intake camshaft pulley "E" mark on exhaust camshaft pulley are aligned with marks on cylinder head cover.
11.If they are not aligned, remove timing belt and start process from tensioner installation.
12.Measure timing belt deflection by applying moderate pressure midway between camshaft pulleys. If deflection is not correct, repeat from tensioner installation. Deflection pressure: 22 lb. (98 N, 10 kg) Deflection: 0.39 - 0.50 inch (11 - 13 mm)
13.Install lower and upper timing belt covers in that order. Tightening torque: 70 - 96 ft. lbs. (7.9 - 10.7 Nm, 0.8 - 1.1 kg-m)
14.Install timing belt guide plate and crankshaft pulley. Tightening torque: 9.0 - 12.6 ft. lbs. (12.3 - 17.2 Nm, 1.3 - 1.8 kg-m)
15.Install water pump pulley. Tightening torque: 9.0 - 12.6 ft. lbs. (12.3 - 17.2 Nm, 1.3-1.8 kg-m)
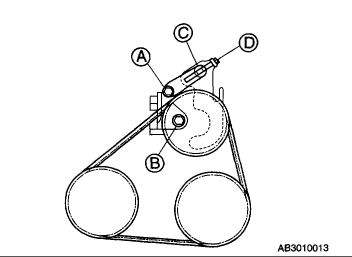

https://www.2carpros.com/forum/automotive_pictures/12900_timingbelt10_1.gif


16.Install generator belt and adjust the tension.
17.Install P/S and/or A/C drive belt and adjust the tension.
18.Connect negative battery cable.
Was this
answer
helpful?
Yes
No
+2
Saturday, March 30th, 2019 AT 8:01 AM (Merged)
Tiny
FAMMECH
  • MEMBER
  • 1 POST
Has anyone actual done this because the instructions don't say how to remove harmonic balancer
Was this
answer
helpful?
Yes
No
+2
Saturday, March 30th, 2019 AT 8:01 AM (Merged)
Tiny
SPOONER1953
  • MEMBER
  • 1 POST
  • 2002 KIA RIO
  • 4 CYL
  • FWD
  • AUTOMATIC
  • 82,000 MILES
My 2002 Kia Rio quit on the interstate - mechanic at the tow shop removed all plugs and claims timing belt blew and threw valves into #4 piston -plug was damaged, scope suggested valve ruined piston- implies $2500 bill to replace with used engine

Is it worth spending money further to a mechanic to confirm the damage is more than just bent/broken valves, or simpler to replace the engine and not bother with further diagnostic work?

I have seen from numerous ads and comments that timing belt problems are common with this motor after 60-80k miles.
Was this
answer
helpful?
Yes
No
Saturday, March 30th, 2019 AT 8:01 AM (Merged)
Tiny
DAVE H
  • MECHANIC
  • 13,383 POSTS
Timing belt is a common fault on this vehicle. If the mechanic has looked into the cylinder with a scope he should have seen the damaged piston ! So further diagnostic procedures would be a waste of money !
Was this
answer
helpful?
Yes
No
Saturday, March 30th, 2019 AT 8:01 AM (Merged)
Tiny
CN314MB
  • MEMBER
  • 1 POST
  • 2001 KIA RIO
Engine Performance problem
2001 Kia Rio Front Wheel Drive Automatic 85000 miles

I am looking the timing marks for t.D.C.
Was this
answer
helpful?
Yes
No
Saturday, March 30th, 2019 AT 8:01 AM (Merged)
Tiny
BLUELIGHTNIN6
  • MECHANIC
  • 16,542 POSTS


https://www.2carpros.com/forum/automotive_pictures/261618_Graphic_96.jpg


https://www.2carpros.com/forum/automotive_pictures/261618_2_54.jpg


https://www.2carpros.com/forum/automotive_pictures/261618_3_25.jpg

Was this
answer
helpful?
Yes
No
Saturday, March 30th, 2019 AT 8:01 AM (Merged)
Tiny
TWIZTIDBADHABITS
  • MEMBER
  • 2 POSTS
  • 2009 KIA RIO
  • 1.6L
  • 4 CYL
  • FWD
  • AUTOMATIC
Timing belt snapped while driving I replace the timing belt I thought I wanted up bright started up it ran rough as hell took everything back off look at the timing the top crank pulley or shaft is off by half turn how do I correct this how do I set the timing
Was this
answer
helpful?
Yes
No
+1
Saturday, March 30th, 2019 AT 8:01 AM (Merged)
Tiny
WRENCHTECH
  • MECHANIC
  • 20,761 POSTS
You aren't off half a turn. If you rotate the engine one more turn it will be in time. It's a 2:1 ratio crank to cam. What you likely do have is bent valves. Because that DOHC is an interference engine.
Was this
answer
helpful?
Yes
No
+1
Saturday, March 30th, 2019 AT 8:01 AM (Merged)
Tiny
TWIZTIDBADHABITS
  • MEMBER
  • 2 POSTS
It's a SOHC Single over head cam any ways how Would you check for a bend valve?
Was this
answer
helpful?
Yes
No
Saturday, March 30th, 2019 AT 8:01 AM (Merged)
Tiny
WRENCHTECH
  • MECHANIC
  • 20,761 POSTS
No, it may only have one pulley in front but it is a DOHC.
See diagram

You would have to do a compression test and possibly a leak down test to get more specific

https://www.2carpros.com/images/external/147822094.jpg
Was this
answer
helpful?
Yes
No
+3
Saturday, March 30th, 2019 AT 8:01 AM (Merged)
Tiny
SOUL6
  • MEMBER
  • 1 POST
  • 2001 KIA RIO
  • 4 CYL
  • FWD
  • AUTOMATIC
  • 148,000 MILES
I have looked at the diagrams for timing belt replacement, on this vehicle, from your site. I have referred also to the specific Q&A about changing the belt but remains one unanswered question. In order to get the belt on it appears that the ENGINE MOUNT be removed in order to get the belt into its position. Is this correct? I see no way to get it on without doing this - or have I missed something?
Was this
answer
helpful?
Yes
No
Saturday, March 30th, 2019 AT 8:01 AM (Merged)
Tiny
MHPAUTOS
  • MECHANIC
  • 31,937 POSTS
Hi there,

Support the engine with a jack and block of wood under the sump remove the engine mount to fit the belt.

Mark (mhpautos)
Was this
answer
helpful?
Yes
No
Saturday, March 30th, 2019 AT 8:01 AM (Merged)
Tiny
TAYNA
  • MEMBER
  • 1 POST
  • 2004 KIA RIO
Other Category problem
2004 Kia Rio 4 cyl Wheel Drive Type unknown Automatic 72000 miles

While stopped in traffic, my vehicle died. Prior to that there was no indicator lights to advise of any problems.

I had my vehicle towed to a dealership. They replaced the timing belt, tensioner, drive belt and 2 oil seals. Now I am using twice as much gas and when driving at 70 mph, my rpm was at 2 and now it 3 and when I am excellerating instead of being at 3, it is running at 4 sometimes 5.

The car dealership states that my car is 100% fine, the issues is in my head, and there is no issue. Can you please advise what could be wrong?
Was this
answer
helpful?
Yes
No
Saturday, March 30th, 2019 AT 8:01 AM (Merged)
Tiny
MHPAUTOS
  • MECHANIC
  • 31,937 POSTS
Take the car to the dealer, get them in the car with you and go for a drive, show them your concerns first hand, if you feel they are not being helpful, go to the manufacture and complain like hell then they start to listen.

Mark (mhpautos)
Was this
answer
helpful?
Yes
No
Saturday, March 30th, 2019 AT 8:01 AM (Merged)

Please login or register to post a reply.

Sponsored links