DIAGNOSIS & OVERHAUL - BORG-WARNER 1350 & 1356 -1991 Ford Pickup F150
Page 1 of 15
ARTICLE BEGINNING
Tips Click a link to view tip
Tip: 4WD NO WORK TIP
JakeP.
DESCRIPTION
NOTE:
For the purpose of this article, Navajo and Explorer names are used interchangeably, as are Ranger and "B" Series unless otherwise noted.
NOTE:
This article does not apply to four wheel drive Mazda "B" Series pickups produced outside of North America.
TRANSFER CASE
The Borg-Warner 1350 is a chain driven, part time 4WD unit. It provides 4 driving modes. This unit offers 2WD and 4WD high ranges, 4WD low range and Neutral. The 1350 has a 3 piece aluminum
case, an internal oil pump driven off the rear output shaft and an angular front output shaft with a cardan joint. Floor mounted shift levers or overhead mounted pushbuttons select driving ranges, high
and low, and driving modes, 2WD and 4WD. Oil pump is driven by rear output shaft. This allows vehicle to be towed for long distances without disconnecting propeller shafts.
ELECTRONIC SHIFT TRANSFER CASE
Some models are equipped with an Electronic Shift Transfer Case which is activated by pushbutton controls located in an overhead console. This system allows the vehicle to be shifted from 2WD high
to 4WD high at any vehicle speed.
OPERATION
ELECTRONIC SHIFT CONTROL SYSTEM
Electronic Shift Operation
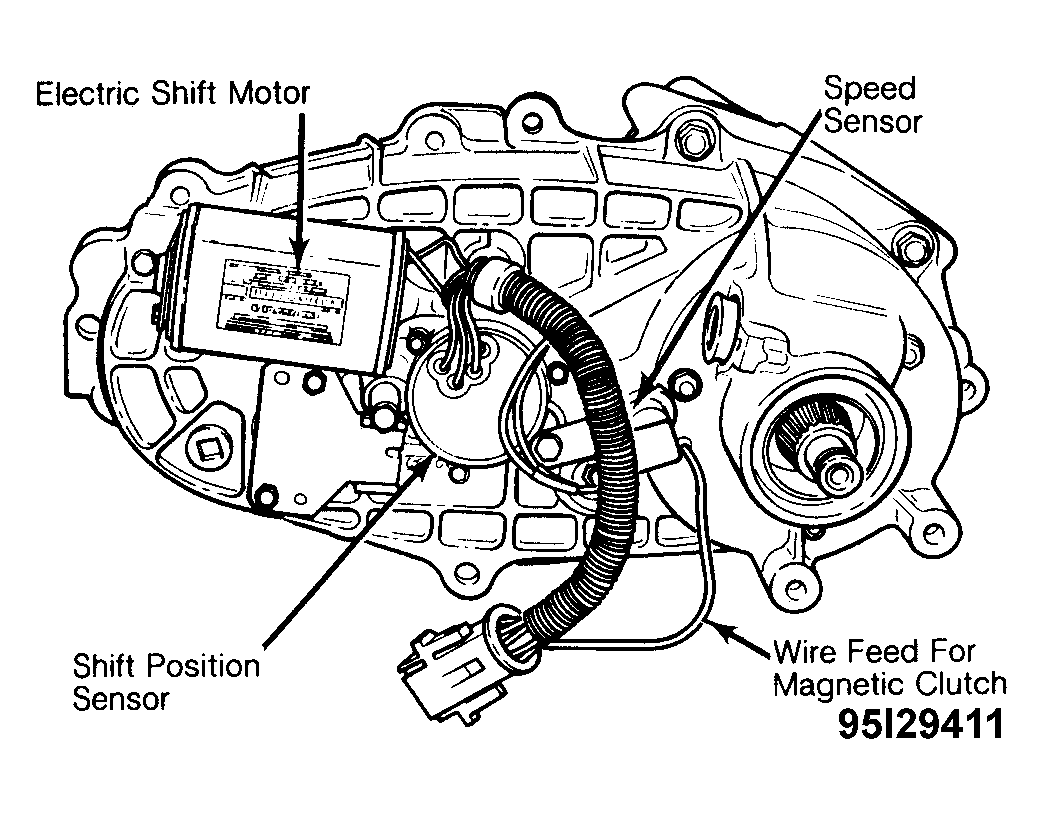
The system consists of a pushbutton control, electronic control module, electric shift motor with integral shift position sensor and a speed sensor.
The transfer case is equipped with a magnetic clutch located inside the case next to the 2WD/4WD shift collar. The clutch is used to spin up the front drive system from zero to vehicle speed in less
than a second. This spin-up allows the 2WD to 4WD shift to be made at any speed.
When the transfer case rear and front output shafts reach the same rotating speed, the spring loaded
12/30/2011
DIAGNOSIS & OVERHAUL - BORG-WARNER 1350 & 1356 -1991 Ford Pickup F150
Page 2 of 15
shift collar mechanically engages the mainshaft hub to the chain drive sprocket. The magnetic clutch is then deactivated. Shifts between 4WD high and 4WD low only occur with clutch interlock or
transmission safety switches closed. Vehicle speed must also be 3 MPH or under.
When the operator selects the 4WD or 2WD drive mode, the actual shifting is carries out by electric motor mounted on the transfer case.
Electronic Control Module
This module controls the operation of the transfer case using inputs from the pushbutton controls, speed sensor and shift position sensor. The module is equipped with a self-test capability.
When either of the 2 switches in the overhead console are depressed, the electronic control module will analyze information from the transfer case shift position sensor to verify its current position. The
module also receives data from the speed sensor and clutch interlock switch, or Neutral safety switch depending on application.
If all design conditions are met, the electronic control module will signal the electric shift motor to shift gear positions. After shift takes place, the module will read the input from the shift position
sensor to determine if transfer case is in desired position. The electronic control module also will illuminate pushbuttons on overhead console indicating shift is completed.
Speed Sensor
Mounted on the rear of the transfer case, the speed sensor tells the electronic control module the correct speed to shift the transfer case. Speed sensor picks up rotating speed of output shaft from 2
notches cut in opposite sides of outer ring of clutch housing assembly. See Fig. 1.
Fig. 1: Electronic Shift Control Transfer Case Courtesy of FORD MOTOR CO.
Shift Position Sensor
The shift position sensor tells the electronic control module the shift position of the transfer case. It is an integral part of the transfer case. See Fig. 1.
Electric Shift Motor
Mounted externally on the rear of the transfer case, this motor is responsible for shifting between 4WD and 2WD. The motor drives a rotary helical cam which moves the 2WD/4WD shift fork and
"4H-4L" reduction shift fork to selected drive position.
LUBRICATION
SERVICE INTERVALS
Check and refill transfer case when malfunction is suspected, fluid leakage or contamination is
12/30/2011
DIAGNOSIS & OVERHAUL - BORG-WARNER 1350 & 1356 -1991 Ford Pickup F150
Page 3 of 15
observed or after axle is submerged in water.
FLUID TYPE
Use Dexron II ATF.
CAPACITY
Refill capacity is 3 pts. (1.4L).
SERVICE (IN VEHICLE)
FRONT OUTPUT SHAFT OIL SEAL R & I
Removal
1.
Raise vehicle on hoist. Remove front drive shaft from axle input yoke. Loosen clamp retaining drive shaft boot to transfer case. Pull drive shaft and boot assembly out of transfer case front
output shaft.
2. Place a drain pan under transfer case, remove drain plug and drain fluid from case. Remove oil seal from front output housing bore with Seal Remover (1175-AC) and Slide Hammer (T50T-
100-A).
Installation
1.
Ensure housing face and bore are free from nicks and burrs. Coat oil seal with multipurpose grease. Position oil seal into front output housing bore, making sure oil seal is not cocked in
bore. Drive oil seal into bore with Driver (T80T-4000-W) and Output Shaft Seal Installer (T83T-7065-B).
Clean transfer case front output female spline and apply small amount of multipurpose grease. Insert front drive shaft male spline. Connect front drive shaft to axle input yoke and tighten
bolts.
Push drive shaft boot to engage external groove on transfer case front output shaft. Secure boot with clamp. Install drain plug and tighten. Remove fill plug and fill transfer case with Dexron
II ATF. Install fill plug and tighten.
2.
3.
REAR OUTPUT SHAFT OIL SEAL R & I
Removal
1.
Raise vehicle on hoist. Remove rear drive shaft from transfer case output shaft yoke. Wire drive shaft out of the way.
Remove output shaft yoke by removing retaining nut, steel washer, and rubber seal from rear of output shaft. Remove oil seal from rear output housing bore with slide hammer.
2.
12/30/2011
DIAGNOSIS & OVERHAUL - BORG-WARNER 1350 & 1356 -1991 Ford Pickup F150
Page 4 of 15
Installation
1.
Make sure output housing bore and face are free from nicks and burrs. Coat oil seal with a small amount of multipurpose grease. Position oil seal into rear output housing bore. Make
sure oil seal is not cocked in bore. Drive seal into bore with Driver (T80T-4000-W) and Output Shaft Seal Installer (T83T-7065-B).
Install yoke, rubber seal, steel washer, and nut on output shaft. Tighten nut. Connect rear drive shaft to transfer case output shaft yoke and tighten bolts.
2.
TESTING
NOTE:
Following test procedures only apply to models equipped with
Electronic Shift Transfer Case.
ELECTRONIC SHIFT TRANSFER CASE
Circuit Protection
The battery feed circuit, through a circuit breaker, provides memory capability for the electronic control module. Ignition "RUN", and "ACC" circuits, through a fuse, supply power for switches and
electric shift motor. The side marker lamp circuit supplies power for illumination of overhead console.
Control Module Self-Test
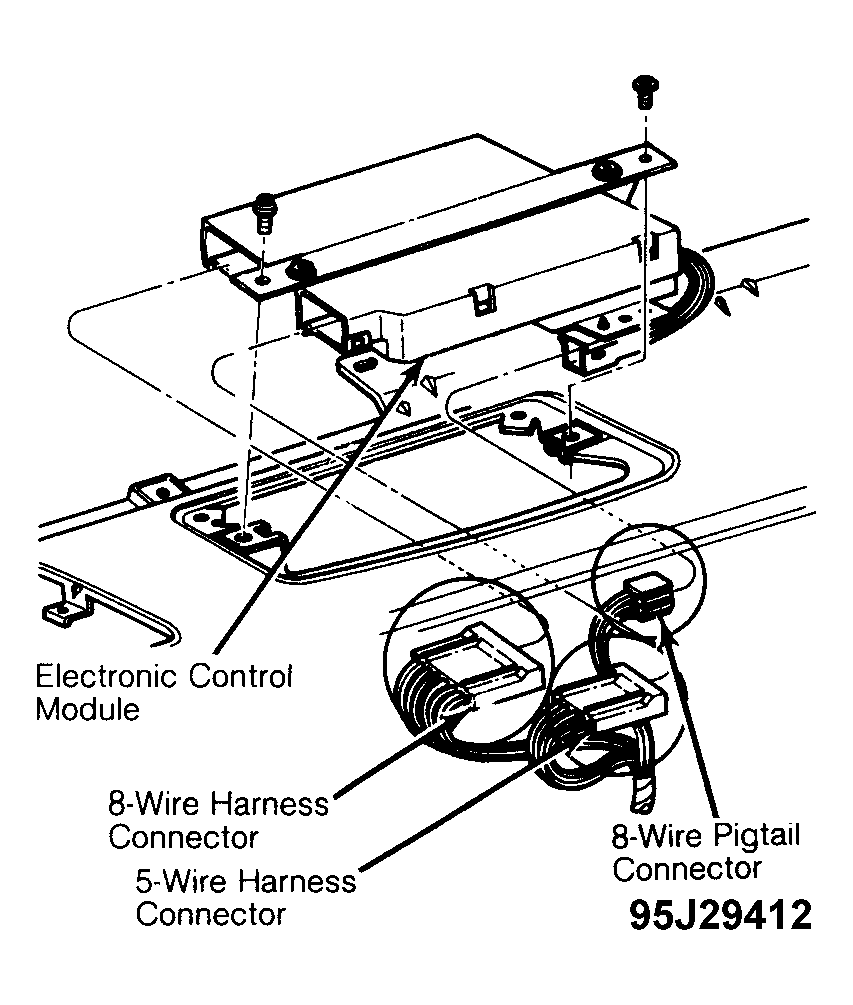
1.
To perform electronic control module self-test, remove the 5-wire connector and the 8-wire connector from the module. Turn ignition switch to "RUN" position. See Fig. 2.
Activate the self-test switch and note result. A flashing indicator lamp indicates control module is okay. A steady indicator light indicates control module is inoperative and must be replaced.
2.
Fig. 2: Electronic Control Module Courtesy of FORD MOTOR CO.
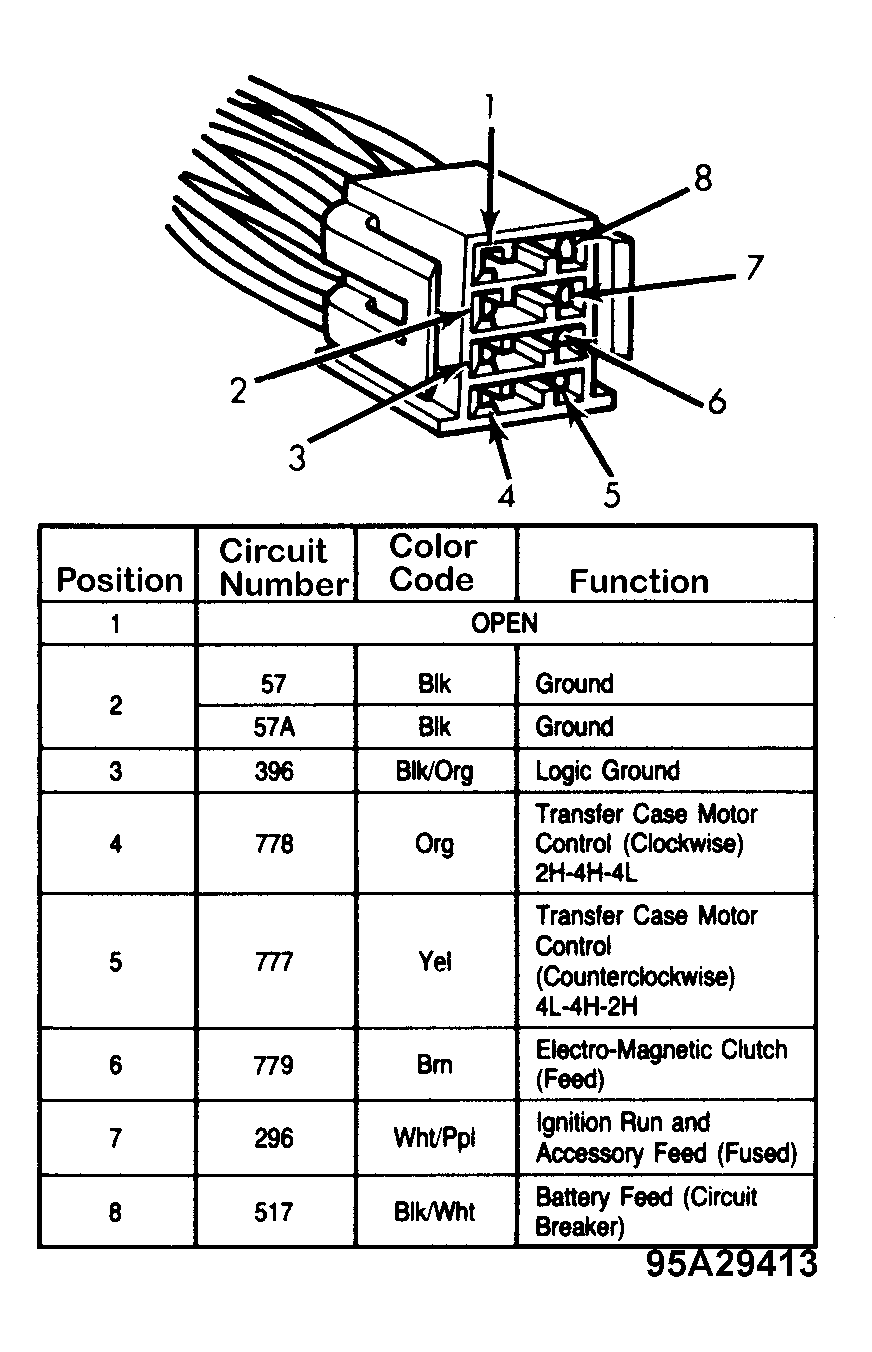
8-Wire Pigtail Connector Test
1.
With ignition off, unplug 8-wire connector from module. Connect voltmeter between terminal No. 8 and ground. Battery voltage should be present at all times. See Fig. 3.
Connect voltmeter between terminal No. 7 and ground. Turn ignition to "RUN" position. Battery voltage should be present.
2.
Fig. 3: 8-Wire Pigtail Connector & Function Chart Courtesy of FORD MOTOR CO.
CAUTION: Turn off ignition before proceeding with ohmmeter tests.
Never connect voltmeter to powered circuit.
12/30/2011
DIAGNOSIS & OVERHAUL - BORG-WARNER 1350 & 1356 -1991 Ford Pickup F150
Page 5 of 15
3.
Connect ohmmeter between terminal No. 6 and ground. There should be less than 10 ohms present. Connect ohmmeter between terminals No. 4 and 5 of connector. Resistance should be
less than 10 ohms.
Connect ohmmeter between terminal 3 and ground. There should be zero ohms. Resistance between terminal 2 and ground should be zero ohms.
4.
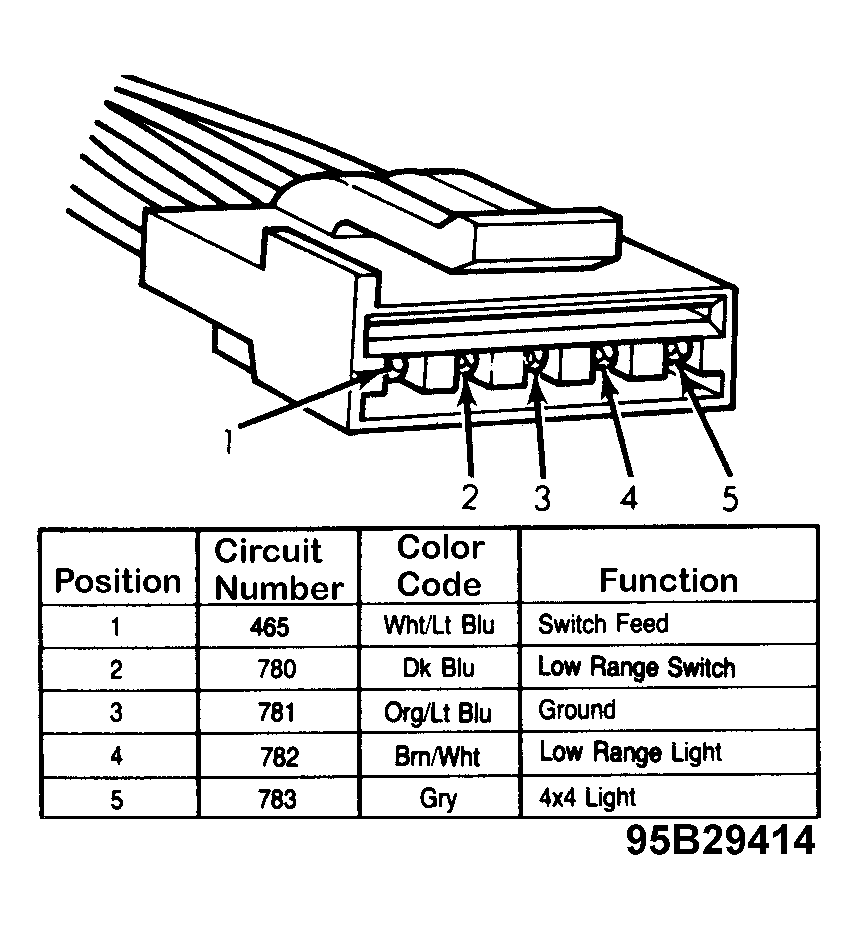
5-Wire Connector Test
1.
Connect ohmmeter between terminals No. 1 and 2. Depress "2H-4H" switch in overhead console. Resistance should be less than 50 ohms while switch is depressed. See Fig. 4.
Connect ohmmeter between terminals No. 1 and 3. Depress "LOW RANGE" switch in overhead console. Resistance should be less than 50 ohms with switch depressed.
2.
Fig. 4: 5-Wire Harness Connector & Function Chart Courtesy of FORD MOTOR CO.
3.
Connect jumper wire between terminal No. 4 and ground. Turn ignition switch to "RUN" position. Light in overhead console low range bar should illuminate. Turn ignition off and
remove jumper wire.
Connect jumper wire between terminal No. 5 and ground. Turn ignition to "RUN" position. The "4 x 4" bar should illuminate on overhead console.
4.
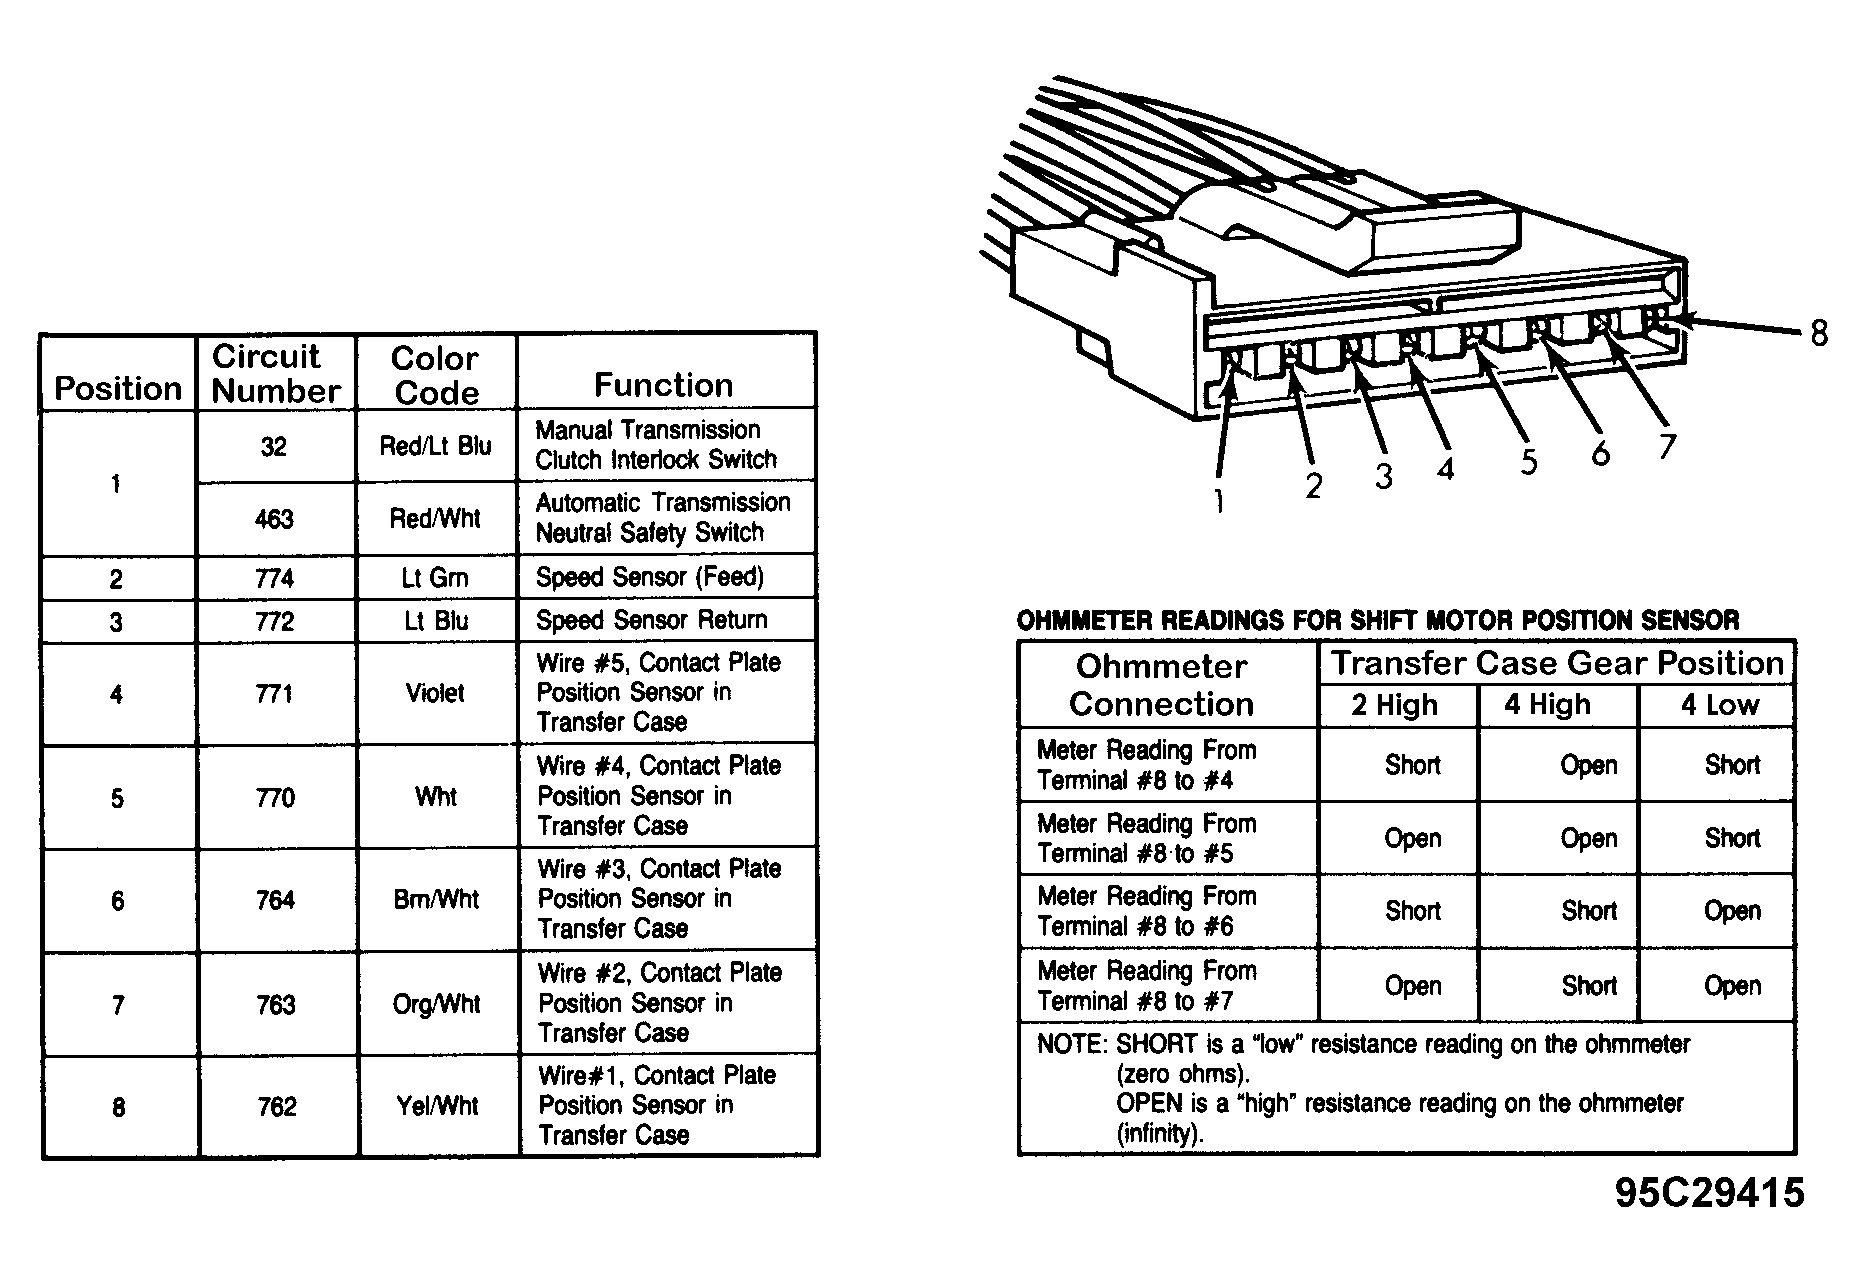
8-Wire Harness Connector Test
1.
Turn ignition off. Connect ohmmeter between terminals No. 1 and ground. On manual transmission, depress clutch pedal and observe ohmmeter. There should be less than 50 ohms.
On automatic transmission, shift transmission into Neutral and observe ohmmeter. There should be less than 50 ohms.
Measure resistance between terminals No. 2 and 3. There should be 200-300 ohms. This checks speed sensor continuity.
Connect ohmmeter between terminal No. 8 and, in turn, terminals No. 4, 5, 6 and 7. Resistance should be as specified. See Fig. 5.
2.
3.
4.
Fig. 5: 8-Wire Harness Connector & Function Charts Courtesy of FORD MOTOR CO.
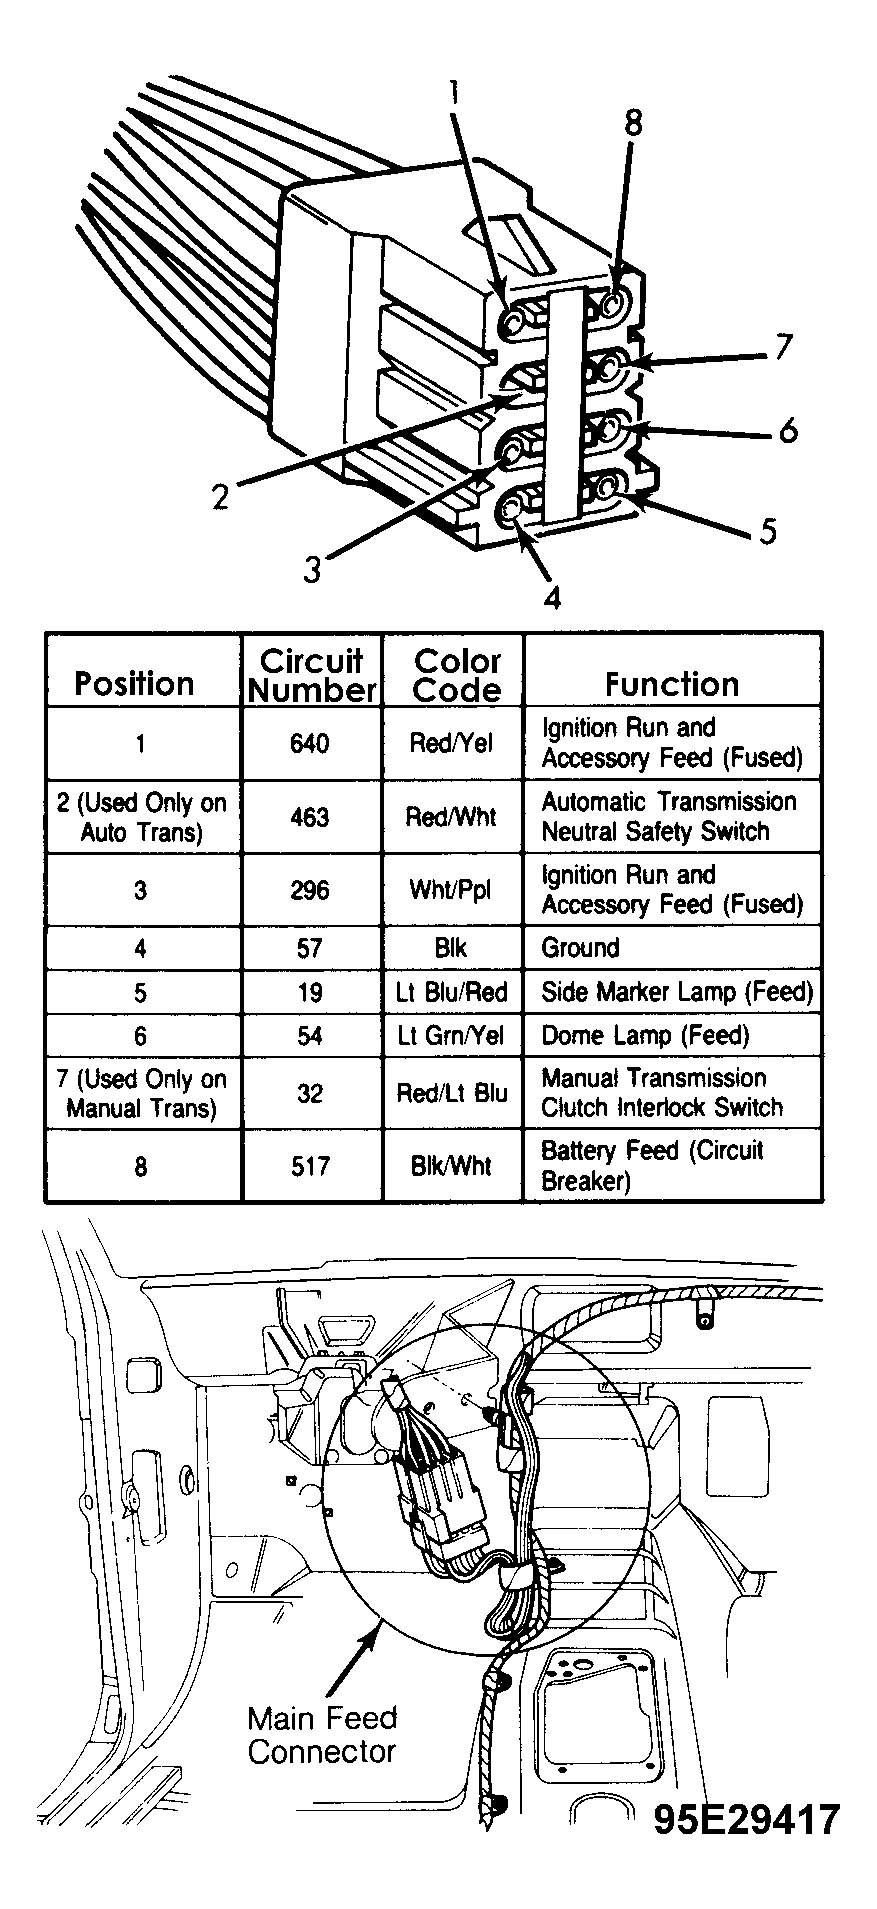
Main Feed Connector
Main feed connector is located near middle of instrument panel. See Fig.
7
1.
.
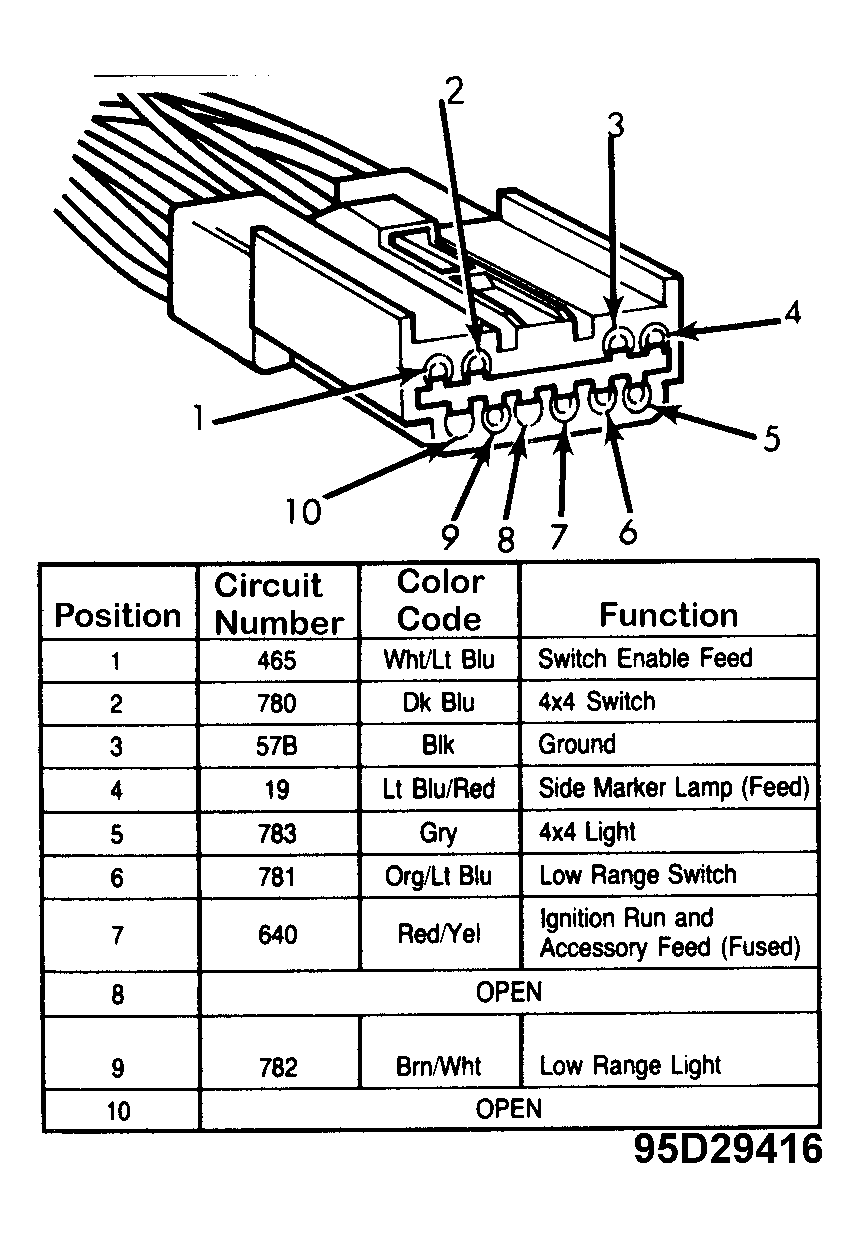
10-Pin Connector
For functions of 10-pin connector, See Fig. 6.
Fig. 6: 10-Pin Connector Harness & Function Chart Courtesy of FORD MOTOR CO.
12/30/2011
DIAGNOSIS & OVERHAUL - BORG-WARNER 1350 & 1356 -1991 Ford Pickup F150
Page 6 of 15
Fig. 7: Main Feed Connector Courtesy of FORD MOTOR CO.
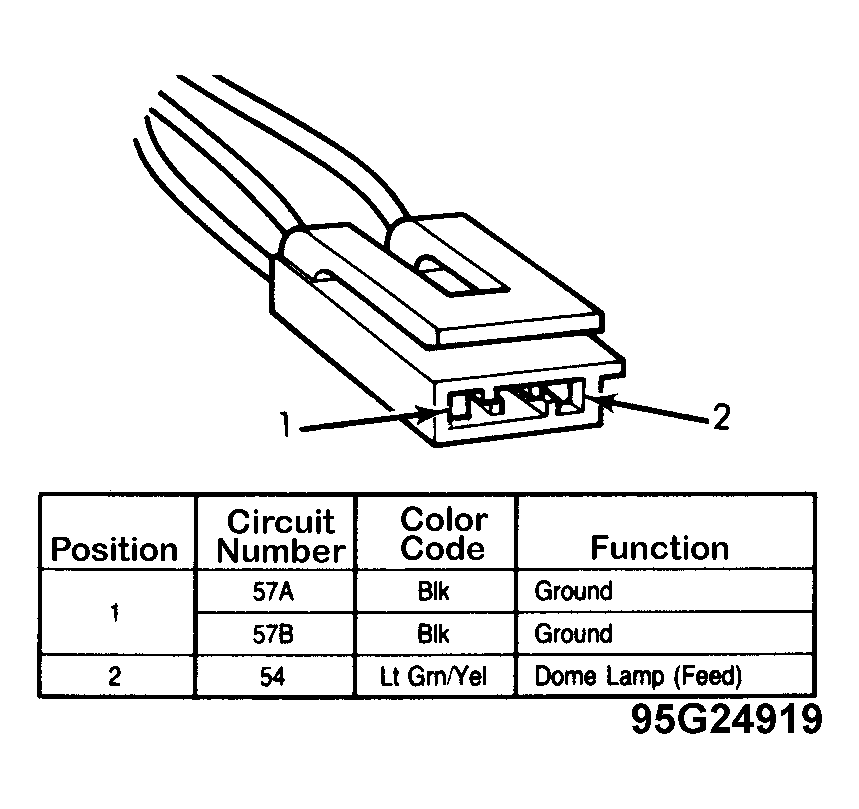
2-Pin Connector
For functions of 10-pin connector, See Fig. 8.
Fig. 8: 2-Pin Connector Harness & Function Chart Courtesy of FORD MOTOR CO.
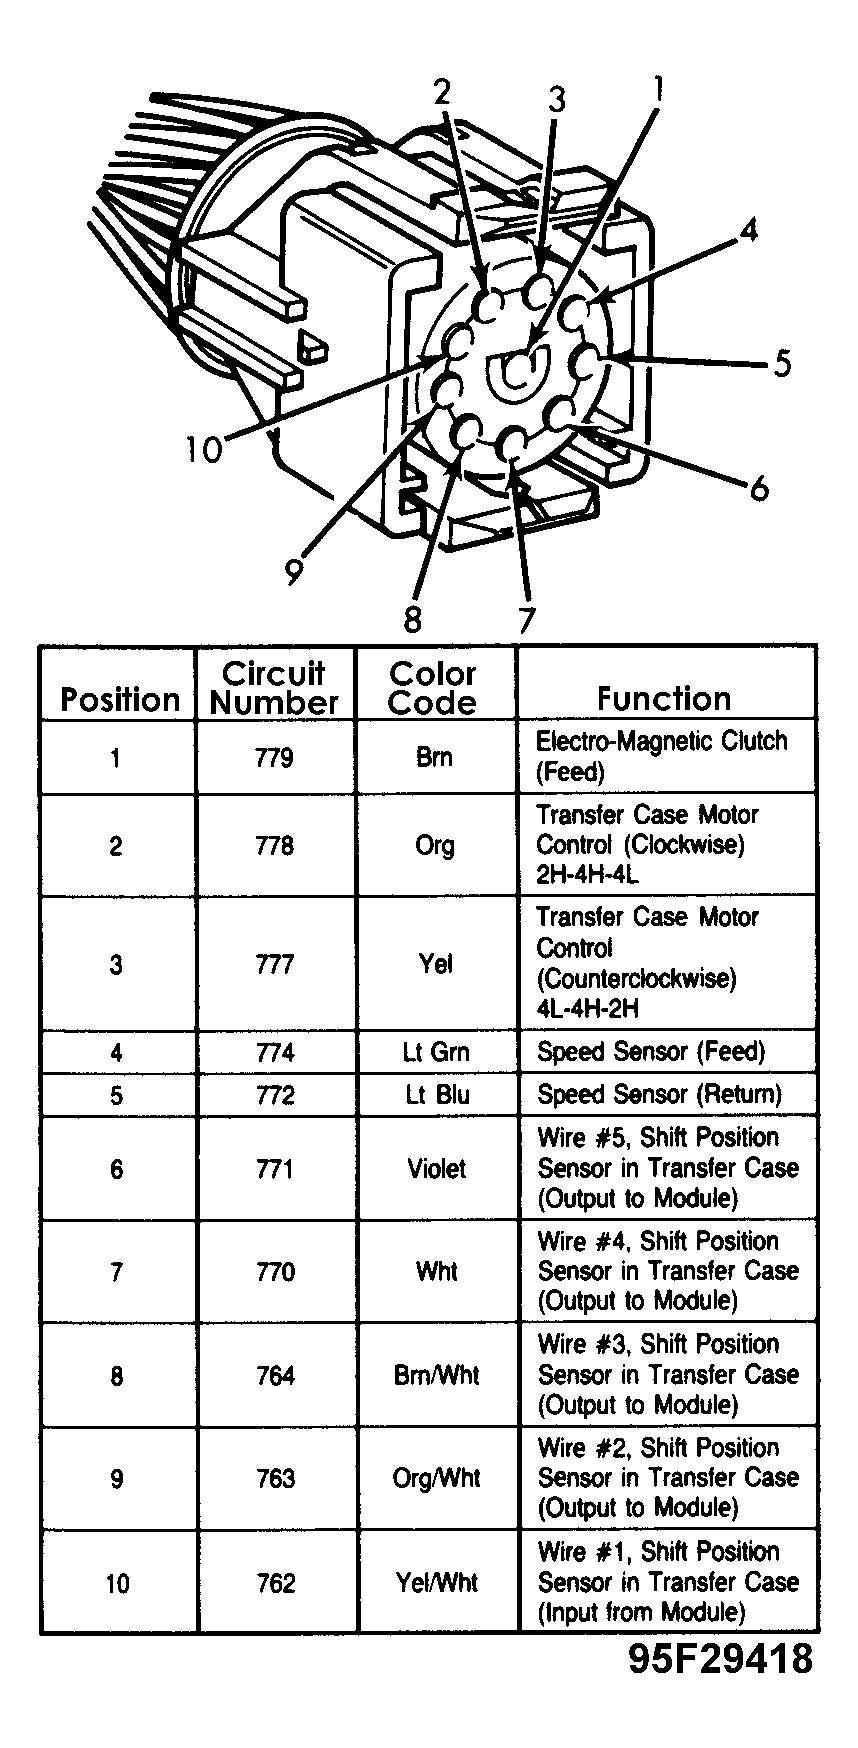
Electronic Transfer Case Feed
For functions of transfer case feed, See Fig. 9.
Fig. 9: Electronic Transfer Case Feed Courtesy of FORD MOTOR CO.
Shift Motor Function
Attach voltmeter to A4 and A5. Have an assistant change shift positions. Voltage should increase for about 1 second and relay should click. If voltage is present, remove shift motor from transfer case
and initiate another shift. Motor should rotate, replace motor if it does not rotate. If voltage is not present to motor, check power circuits and range sensors.
NOTE:
If transfer case range sensors are providing incorrect data, control module will not power motor.
Shift Motor Chatters, But Will Not Shift
Tips Click a link to view tip
Tip: 4WD transfer case shift motor issues Question: 4 wheel drive
Tech1
Tech1
During a shift from 2H to 4H, motor chatters or clicks but does not shift. Motor may hunt to find 4H and overshoot, then hunt back and overshoot again. After 7-10 seconds, module returns shift motor to
2H (default). If shift motor is running too fast or braking too slowly for proper positioning, it must be replaced.
SHIFT MOTOR POSITION
Motor Position
Dash & Switch
Lights No
No No
Mech Position
(1)
(1)
(1)
(1)
B7
B6
B5
B4
2H Edge 1
2H-4H
2H 2H
2H
Open Closed
Closed
Closed Closed
Open
Open Open
Open
Closed Closed
Closed
12/30/2011
DIAGNOSIS & OVERHAUL - BORG-WARNER 1350 & 1356 -1991 Ford Pickup F150
Page 7 of 15
No 4H On
4H On 4H On
4H On 4H & 4L On
(1) Three or more open readings in any position indicates a fault with motor and sensor assembly.
(2) In Edge 2, pressing 4H switch moves to 4H position and light comes on.
4H 4H
4H Neutral
4L 4L
Closed Closed
Closed Open
Open Open
Closed Closed
Closed - Closed
Closed Open
Open Open
Closed Closed
Closed Closed
Closed Open
Open Open
Closed Closed
(2)
Edge 2 4H
Edge 3 4H-4L
Edge 4 4L
(3)
(3)
(3) If motor is in Edge 3, 4H-4L or Edge 4 at start up, control module will attempt shift to 4H. 4H shift requires that vehicle is stopped, clutched depressed or A/T in Neutral. Until these
conditions are met and shift is completed, pushing buttons will not do anything.
REMOVAL & INSTALLATION
TRANSFER CASE
Removal
1.
Raise vehicle on hoist. Remove skid plate (if equipped). Remove drain plug and drain transfer case lubricant. Disconnect 4WD indicator switch wire at transfer case. On electric shift models,
disconnect wiring harness plug at rear of transfer case. On manual and electric shift models, disconnect front drive shaft from axle input yoke.
Loosen clamp retaining front drive shaft boot to transfer case. Pull drive shaft and front boot assembly out of transfer case front output shaft. Disconnect rear drive shaft from transfer case
output yoke. Disconnect speedometer driven gear from case rear cover.
Disconnect vent hose from control lever. Loosen or remove large and small bolts retaining shifter to extension housing. Pull on control lever until bushing slides off transfer case shift
lever pin. If necessary, unscrew shift lever from control lever. Remove heat shield from transfer case.
Support transfer case with a transmission jack. Remove transfer case-to-transmission bolts. Slide transfer case rearward off transmission, and lower case from vehicle. Remove gasket
from between transfer case and extension housing.
2.
3.
4.
Installation
1.
Install new transfer case-to-extension housing gasket. Position transfer case so input shaft splines align with transmission output shaft. Slide case forward onto transmission output shaft
and dowel pin.
2. Install transfer case-to-transmission bolts. Tighten bolts evenly and in a clockwise sequence from locating pin, as viewed from front of vehicle.
Remove jack from transfer case. Install heat shield on transfer case. Move control lever until bushing is in position over transfer case shift lever pin. Install both attaching bolts by hand.
Tighten large bolt retaining shifter to extension housing first. Tighten small bolt next.
3.
12/30/2011
DIAGNOSIS & OVERHAUL - BORG-WARNER 1350 & 1356 -1991 Ford Pickup F150
Page 8 of 15
4.
Install vent assembly so White marking on hose is in position in notch on shifter. Vent hose should be positioned so that upper end of hose is about 2" above top of shifter and inside shift
boot. Connect speedometer gear to transfer case rear cover.
Connect rear drive shaft to transfer case output shaft yoke. Clean transfer case front output shaft female splines. Apply a small amount of multipurpose grease to splines. Insert front drive
shaft male spline.
Connect front drive shaft to axle input yoke and tighten bolts. Push drive shaft boot to engage external groove on transfer case front output shaft. Secure boot with clamp. Connect 4WD
indicator switch wire connector at transfer case. On electric shift models, plug in motor wire connectors.
Install drain plug and tighten. Fill transfer case with Dexron II ATF. Install fill plug. Install skid plate to frame and tighten bolts, if used.
5.
6.
7.
Fig. 10: Electric Shift Harness Connector Courtesy of FORD MOTOR CO.
OVERHAUL
TRANSFER CASE
Disassembly (Transfer Case)
1.
Drain and remove transfer case from vehicle. Remove 4WD indicator switch and breather vent. Remove rear output shaft yoke by removing retaining nut, steel washer and rubber seal from
output shaft. On "STX" models, remove front output shaft yoke by removing lock nut, steel washer and rubber seal from output shaft.
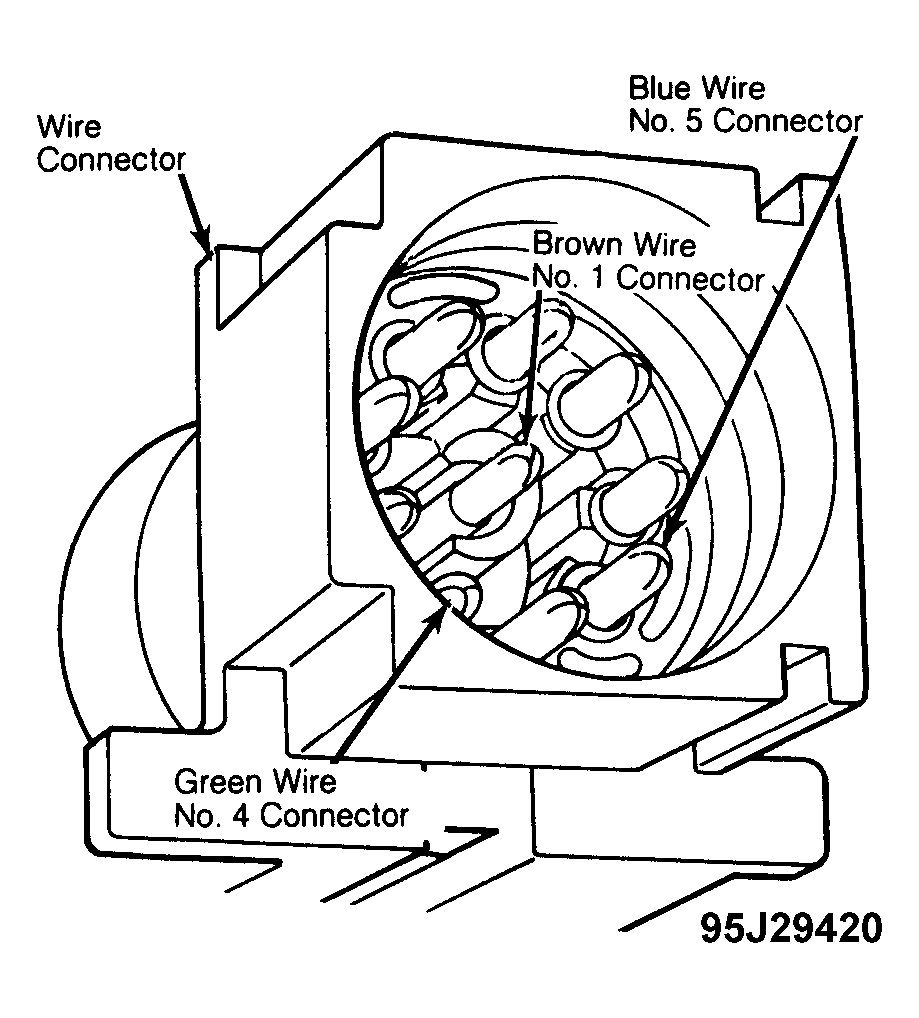
On electronic shift transfer case, fabricate tool by forming small hook at tip of paper clip or safety pin. Remove locking sleeve from connector by hooking with tool and pulling from
bottom. See Fig. 10. Remove Brown wire (center), Green (No. 4) and Blue (No. 5) by pulling from back of connector.
Remove speed sensor retaining bracket screw, bracket and sensor. See Fig. 1
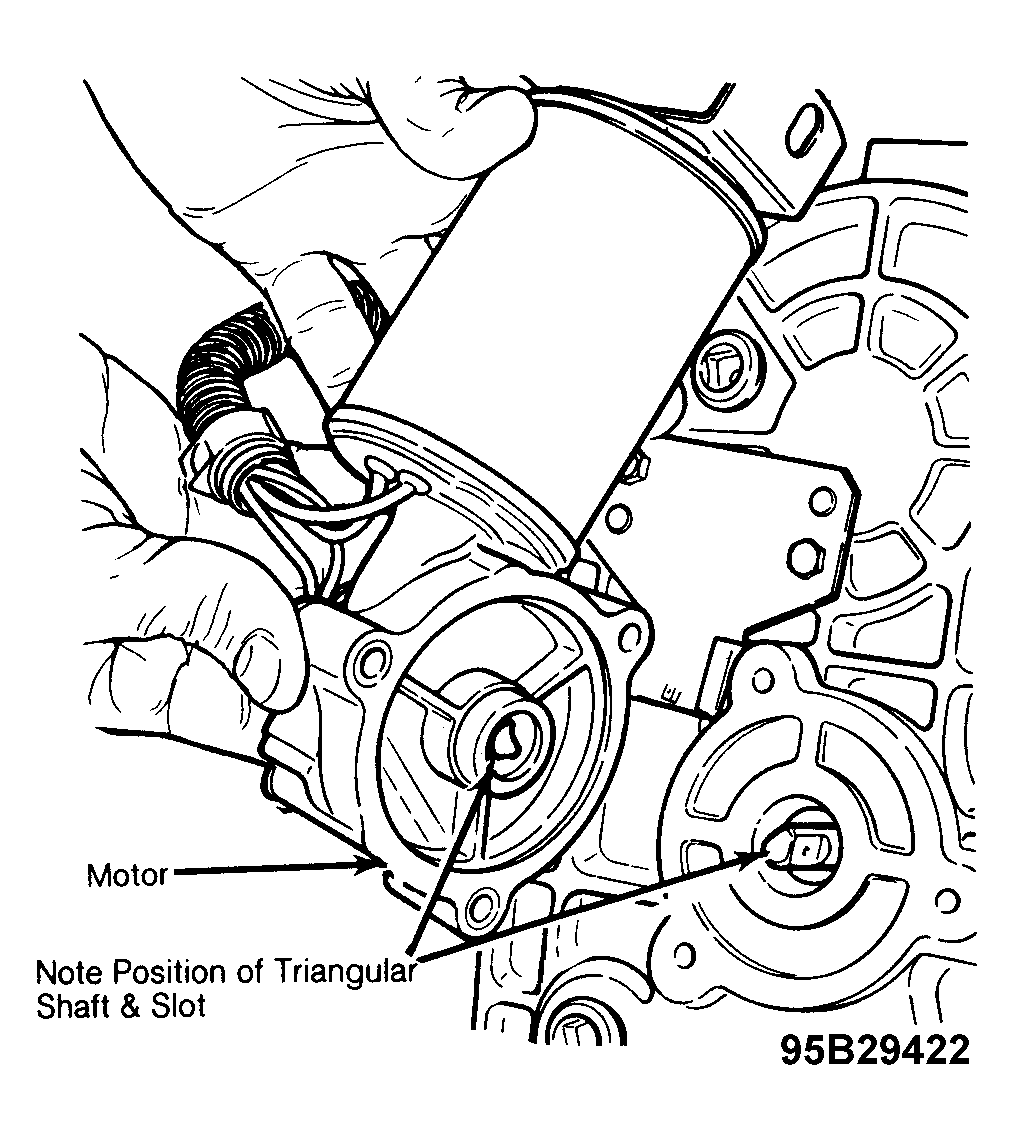
electric motor mount bolts and motor. Note position of triangular shaft in case and triangular slot in electric motor. See Fig. 12.
2.
. Remove 3
3.
CAUTION: Motor is serviced as an assembly only. DO NOT remove
motor rear cover.
Fig. 11: View of Borg-Warner Manual Shift 1350 Transfer Case Courtesy of FORD MOTOR CO.
4.
On manual and electronic shift transfer cases, remove 9 bolts retaining front case to rear cover. Insert a 1/2" drive breaker bar between pry bosses to separate front case and rear cover.
Remove RTV gasket sealer from mating surfaces.
Fig. 12: View of Electric Shift Motor & Shift Cam Alignment Courtesy of FORD MOTOR CO.
12/30/2011
DIAGNOSIS & OVERHAUL - BORG-WARNER 1350 & 1356 -1991 Ford Pickup F150
Page 9 of 15
5.
If replacing speedometer drive gear or ball bearing assembly, drive output shaft oil seal from inside of rear cover with a brass drift and hammer. Remove speedometer drive gear assembly.
Note that round end of speedometer gear clip faces inside of rear cover.
Remove output shaft ball bearing internal snap ring. Remove ball bearing with Driver (T80T- 4000-W) and Output Shaft Bearing Replacer (T83T-7027-B) from outside of case.
If necessary, remove front output shaft caged needle bearing from rear cover using Puller (D80L-100-S) and slide hammer. On electronic shift models, remove 3 nuts retaining clutch
coil to rear cover. Remove coil assembly, "O" rings and Brown wire from cover. Remove clutch housing assembly from output shaft.
On manual and electronic shift models, remove 2WD/4WD shift fork spring from boss on 2WD/4WD shift fork. On manual shift models only, remove shift collar hub from output shaft.
On manual and electronic shift models, remove 2WD/4WD lock-up assembly and 2WD/4WD shift fork as an assembly. Remove 2WD/4WD lock-up assembly from 2WD/4WD shift fork.
See Fig. 13. If necessary, remove external clip and roller bushing assembly from 2WD/4WD shift fork. Pull out shift rail.
6.
7.
8.
9.
Fig. 13: Removing Shift Collar Hub & Drive Chain Courtesy of FORD MOTOR CO.
10.
If disassembly of 2WD/4WD lock-up assembly is necessary, remove internal snap ring and pull lock-up hub and spring from lock-up collar. See Fig. 11. Remove external snap ring and
thrust washer that retains driven sprocket to front output shaft.
On electronic shift models, remove helical cam assembly from front case. If necessary, remove helical cam, torsion spring and sleeve from shaft.
On manual and electronic shift models, remove chain, driven sprocket, and drive sprocket as an assembly. Remove collector magnet from front case. If disassembling oil pump, remove bolts
from pump body.
11.
12.
NOTE:
Note position and markings of oil pump front cover, body, pins,
rear cover, and pump retainer.
13.
Slip high-low range shift fork out of inside track of shift cam. If necessary, remove external clip and roller bushing assembly from high-low range shift fork. Remove high-low shift hub
from planetary gear set in front case. See Fig. 14.
Fig. 14: High-Low Range Shift Assembly & Output Shaft (Manual Shift Model Shown; Electronic Shift Model Similar)
Courtesy of FORD MOTOR CO.
14.
On manual shift models, remove anchor end of assist spring from locking post in front case half. Remove spring and roller out of shift cam.
On manual and electronic shift models, turn case over. Remove 6 mounting adapter retaining bolts from front case. Remove mounting adapter, input shaft and planetary gear set as an
assembly.
Expand tangs of large snap ring in mounting adapter, and pry under planetary gear set with screwdrivers. Separate input shaft and planetary gear set from mounting adapter. See Fig. 15.
If required, remove oil seal from mountin
15.
16.
17.
G adapter with slide hammer. Remove internal snap
12/30/2011
DIAGNOSIS & OVERHAUL - BORG-WARNER 1350 & 1356 -1991 Ford Pickup F1. Page 10 of 15
ring from planetary carrier. Separate planetary gear set from input shaft assembly.
Remove external snap ring from input shaft. Press ball bearing from input shaft. Remove thrust washer, thrust plate and sun gear off input shaft. See Fig. 15.
18.
Fig. 15: Exploded View of Planetary Gear Set Courtesy of FORD MOTOR CO.
19.
If necessary, press ring gear from front case. Note relationship of serrations to chamfered pilot diameter during removal.
On manual shift models, move shift lever by hand until shift cam is in "4WH" detent position. Scribe a line on outside of front case using side of shift lever and a grease pencil. See Fig. 16.
Remove 2 Torx head set screws from front case and shift cam.
Turn front case over and remove external clip. Pry shift lever out of front case and shift cam. DO NOT pound on external clip during removal. Turn front case over and remove external
clip. Pry shift lever assembly out of front case and shift cam. Remove "O" ring from second groove in shift lever shaft. Remove detent plunger and compression spring from inside of front
case.
20.
21.
Fig. 16: Shift Lever & Cam Assembly For Manual Shift Models Courtesy of FORD MOTOR CO.
22.
On manual and electronic shift models, remove internal snap ring and ball bearing retainer from front case. It may be necessary to tap on face of front output shaft and "U" joint assembly
with a plastic hammer. Remove internal snap ring and drive ball bearing out of bearing retainer. See Fig. 17.
NOTE:
The clip on bearing retainer is required to prevent bearing retainer from rotating. DO NOT discard clip.
Disassembly ("U" Joints)
1.
Remove front output shaft and "U" joint assembly from front case. If necessary, remove oil seal with slide hammer. If necessary, remove internal snap ring and drive ball bearing out of
front case bore.
Place front output shaft and "U" joint assembly in a soft-jawed vise. Remove internal snap rings that retain bearings in shaft.
3. Position "U" Joint Remover/Installer (T74P-4635-C) over shaft and press bearing out. If bearing cannot be pressed completely out, remove it with a pair of vise grips or channel lock
pliers. Reposition tool on spider to remove opposite bearing. Repeat procedure until all bearings are removed.
2.
Fig. 17: Removing/Installing Front Output Shaft Assembly Courtesy of FORD MOTOR CO.
Reassembly ("U" Joints)
1.
Lubricate all parts with Dexron II ATF during reassembly. Support front output shaft in soft- jawed vise. If removed, start new bearing into end of shaft. Position spider into bearing and
12/30/2011
DIAGNOSIS & OVERHAUL - BORG-WARNER 1350 & 1356 -1991 Ford Pickup F1. Page 11 of 15
press bearing below snap ring groove using "U" joint installer. Remove tool and install new internal snap ring in groove.
2. Start new bearing into opposite end of shaft. Using "U" joint installer, press bearing until opposite bearing contacts snap ring. Remove tool and install new internal snap ring in groove.
Reposition front output shaft assembly and install other 2 bearings in same manner.
3. Check "U" joint for binding. If "U" joint shows any sign of binding, tap both shafts sharply to relieve bind.
Reassembly (Transfer Case)
1.
If removed, drive ball bearing into front output case bore using Driver (T80T-4000-W) and Output Shaft Bearing Replacer (T83T-7025-B). Ensure bearing is not cocked in bore. Install
retaining snap ring for ball bearing. If removed, install front output oil seal in front case bore. If removed, install ring gear in front case. Align serrations on outside diameter of ring gear to
serrations previously cut in front case bore. Start piloted chamfered end of ring gear first and press in until it is fully seated. Ensure ring gear is not cocked in bore.
If removed, install ball bearing in bearing retainer bore. Drive bearing into retainer using driver and output shaft bearing replacer. Make sure ball bearing is not cocked in bore. Install ball
bearing-to-retainer snap ring. Install front output shaft and "U" joint assembly through front case oil seal.
Position ball bearing and retainer assembly over front output shaft and install in front case
bore. Clip on bearing retainer must align with slot in front case. Tap bearing retainer into place. Install internal snap ring. See Fig. 17.
On manual shift models, install compression spring and detent plunger into bore from inside of front case. If disassembled, install shift lever cam shaft to shift lever and tighten nut. After
coating new "O" ring with grease, install "O" ring in second groove of shift lever shaft. Use a rubber band to fill the first groove so as not to cut "O" ring. Discard rubber band.
With shift cam, shift lever and snap ring installed in front case, position shift lever in "4WH" detent position (line scribed during disassembly). Place assist spring roller on 90 degree bend
tang of assist spring. Insert roller into assist spring roller slot of shift cam. See Fig. 18. Position middle section of assist spring into groove of front case pivot boss. Push in and lock
the upper end of assist spring behind front case spring anchor tab. See Fig. 18.
Install 2 Torx head screws in front case and in shift cam. Tighten screws. Ensure set screw in front case is in first groove of shift lever shaft and not bottomed out against shaft itself. Shift
lever should be able to move freely to all detent positions.
On manual and electronic shift models, slide sun gear, thrust plate and thrust washer over input shaft. Press ball bearing over input shaft. Install external snap ring to input shaft. Install
planetary gear set on sun gear and install input shaft assembly. Install internal snap ring on planetary carrier.
2.
3.
4.
5.
6.
7.
8.
9.
NOTE:
Sun gear recessed face and ball bearing snap ring groove should
face toward rear of transfer case. Stepped face of thrust washer should face toward ball bearing.
Fig. 18: Installing Assist Spring On Manual Shift Models Courtesy of FORD MOTOR CO.
12/30/2011
DIAGNOSIS & OVERHAUL - BORG-WARNER 1350 & 1356 -1991 Ford Pickup F1. Page 12 of 15
10.
Drive oil seal into bore of mounting adapter. Place tanged snap ring in mounting adapter groove. Position input shaft and planetary gear set in mounting adapter and push inward until
planetary assembly and input shaft assembly are seated in adapter. Snap ring should snap into place.
Hold mounting adapter by hand and tap face of input shaft against wood block to ensure snap ring is engaged. Apply RTV sealer to mating surface of front case and mounting adapter.
Position adapter on case. Install retaining bolts and tighten.
On manual shift models only, position roller on 90 degree bend tang of assist spring. Larger diameter end of spring must be installed first. Install roller into assist spring roller track of shift
cam while at same time locating center of spring in pivot groove in front case. See Fig. 14 and Fig. 16. Push anchor end of assist spring behind locking post adjacent to ring gear face.
On manual and electronic shift models, position high-low shift hub into planetary gear set. Ensure nylon wear pads are installed on shift fork. Dot on pad is installed in shift hole.
Slip high-low shift fork bushing into high-low roller track of shift cam and groove of high-low shift hub. See Fig. 14 and Fig. 16. Install shift rail through high-low fork and make sure shift
rail is seated in bore in front case.
11.
12.
13.
14.
NOTE:
Ensure Nylon wear pads are installed on shift fork and dot on pad
is installed in fork hole.
15.
On manual and electronic shift models, place oil pump cover with word "TOP" facing front of front case. Install 2 pump pins (flats facing upward) with spring between pins and place
assembly in oil pump bore in output shaft. Place the oil pump body and pick-up tube assembly over shaft. Be sure the pins are riding against inside of pump body.
Place oil pump body and pick-up tube over shaft. Ensure pins are riding against inside of pump body. Install oil pump rear cover with words "TOP REAR" facing rear of front case. Word
"TOP" on front cover and rear cover should be on same side.
Install pump retainer so tabs face the front of transfer case. Install 4 bolts and rotate output shaft while tightening bolts to prevent pump from binding.
16.
17.
CAUTION: Output shaft must turn freely within oil pump. If binding occurs, loosen 4 bolts and retighten.
18.
Install output shaft and oil pump assembly in input shaft. Ensure external splines of output shaft engage internal splines of high-low shift hub. Make sure oil pump retainer and oil filter
leg are in groove and notch of front case. Install collector magnet in notch in front case. 19. Install chain, drive sprocket and driven sprocket as an assembly over shafts. Install thrust
washer on front output shaft and external snap ring over thrust washer to retain driven sprocket.
If disassembled, assemble 2WD/4WD lock-up assembly. Install spring in lock-up collar. On electronic shift models, small end of spring in lock-up collar. On manual and electronic shift
models, place lock-up hub over spring and engage lock-up hub in notches in lock-up collar. Install internal snap ring. See Fig. 19 and Fig. 21 through Fig. 24.
20.
Fig. 19: Exploded View 2WD/4WD Lock-Up Assembly Courtesy of FORD MOTOR CO.
12/30/2011
DIAGNOSIS & OVERHAUL - BORG-WARNER 1350 & 1356 -1991 Ford Pickup F1. Page 13 of 15
21.
Install 2WD/4WD shift fork to 2WD/4WD lock-up assembly. If removed, ensure Nylon wear pads are installed on fork and dot on pad is installed in hole in fork. Install 2WD/4WD lock-up
collar and hub assembly over output shaft and onto shift rail. See Fig. 13.
If removed, install shaft, bushing and external clip on 2WD/4WD lock-up fork. Install shift collar hub on output shaft. If removed, drive caged needle bearing into rear cover bore. If
removed, install ball bearing in rear cover bore. Install ball bearing internal snap ring.
On electronic shift models, assemble spring spacer on camshaft. Slide spring spacer then spring onto camshaft. Position first spring tang to left side of drive tang. Wind second spring tang
back to right side of drive tang. Slide spring and spacer in as far as possible. Install helical cam onto camshaft with cam tang in between spring tangs. See Fig. 20.
22.
23.
Fig. 20: Attaching Spring Tangs to Camshaft Tangs Courtesy of FORD MOTOR CO.
24.
Install tang end of camshaft assembly over alignment pin in front case. Camshaft assembly tangs should point toward top of case and rest on high-low shift fork assembly.
Lift 2WD/4WD shift fork slightly while holding shift rail down. Rotate helical cam track into high-low and 2WD/4WD fork roller bushings by turning camshaft assembly.
25.
NOTE:
The triangular shaft will be in 2 wheel high position at final
assembly.
26.
If disassembled, assemble shift collar hub to clutch housing. Install snap ring. Install clutch housing assembly on output shaft.
27. Install new "O" rings on clutch coil assembly studs and grommet. Install clutch coil assembly from inside rear cover until wire and studs extend through cover. Ensure Brown wire exits case
and is not pinched.
Final Reassembly (Manual Shift Models)
1.
Install speedometer drive gear assembly into rear cover bore with round end of speedometer gear clip facing toward inside of rear cover. Drive oil seal into rear cover bore.
Transfer case shift lever assembly should be shifted into "4H" detent position to assure positioning of shift rail to rear cover.
Coat mating surface of front case with a bead of RTV sealer. Install 2WD/4WD shift fork spring on shift rail and shift fork with spring mounted in vertical position.
Position rear cover on front case so that spring boss engages 2WD/4WD shift fork spring and shift rod. Install bolts and tighten.
2.
3.
4.
CAUTION: If rear cover assembly does not seat properly, move rear cover up and down slightly to permit end of shift rail to enter
shift rail hole in rear cover boss.
5.
Install rear yoke on output shaft. Install rubber seal, washer, and nut. Tighten nut to specifications. For "STX" models, install front yoke on output shaft, rubber seal, steel washer
and lock nut.
Install 4WD indicator switch and breather plug.
6.
Install drain plug. Fill transfer case with
12/30/2011
DIAGNOSIS & OVERHAUL - BORG-WARNER 1350 & 1356 -1991 Ford Pickup F1. Page 14 of 15
Dexron II ATF. Install fill plug.
Final Reassembly (Electronic Shift Models)
1.
Coat mating surface of front case with a bead of RTV sealer. Install 2WD/4WD shift fork spring on shift rail and shift fork with spring mounted in vertical position.
Position rear cover on front case so that output shaft aligns with rear cover output shaft bore. Camshaft assembly must align with rear cover motor bore.
If cover will not seat, tap output shaft with rubber mallet in direction away from triangular shaft while pushing down on rear cover. Another method is to insert screwdriver through
sensor bore in rear cover so blade engages slot in middle of 2WD/4WD shift fork. Move fork toward triangular shaft to engage shift rail in rear cover bore.
Install and tighten transfer case cover bolts. Using pliers with wood or copper jaws, rotate triangular shaft it aligns with triangular slot in motor. Install electric motor and tighten
retaining screws.
If shaft will not stay in 4WD high position, rotate shaft to 2WD position. Install motor and rotate counterclockwise until motor is aligned with mounting holes.
6. Install speed sensor and retaining bracket. Reconnect Brown, Green and Blue wires into connector. Install locking sleeve into connector.
If removed, install wire harness bracket on rear cover. Install speedometer drive gear in rear cover bore. Install oil seal in rear cover bore.
Install rear companion flange on output shaft. Install rubber seal, washer, and nut. Tighten nut.
9. Install breather plug and drain plug. Fill transfer case with Dexron II ATF. Install fill plug.
2.
3.
4.
5.
7.
8.
TRANSFER CASE EXPLODED VIEWS
Fig. 21: Borg-Warner 1350 Electronic Shift Transfer Case Courtesy of FORD MOTOR CO.
Fig. 22: Borg-Warner 1350 Manual Shift Transfer Case Courtesy of FORD MOTOR CO.
Fig. 23: Borg-Warner 1356 Electronic Shift Transfer Case Courtesy of FORD MOTOR CO.
Fig. 24: Borg-Warner 1356 Manual Shift Transfer Case Courtesy of FORD MOTOR CO.
TORQUE SPECIFICATIONS
TORQUE SPECIFICATIONS Application
Breather Vent Case-to-Cover Bolts
Drain & Fill Plug
Ft. Lbs. (N.M) 6-14 (8-19)
23-30 (31-41) 14-22 (19-30)
12/30/2011
DIAGNOSIS & OVERHAUL - BORG-WARNER 1350 & 1356 -1991 Ford Pickup F1. Page 15 of 15
Front & Rear Drive Shaft Bolts
Rear Drive Shaft Companion Flange Bolts Shift Control Bolts (Mechanical Shift)
Large Small
Shift Lever Nut
Skid Plate-to-Frame Bolt Transfer Case-to-Transmission
Upper Shift Control Lever & Heat Shield Bolts Yoke Nut
4WD Indicator Switch
12-15 (16-20) 61-87 (83-118)
70-90 (95-122) 31-42 (42-57)
19-26 (25-35) 22-30 (30-41)
25-35 (34-47) 27-37 (37-50)
120-150 (163-203) 25-35 (34-47)
INCH Lbs. (N.M) 36-40 (4.0-4.5)
72-96 (8.1-10.8) 60-84 (6.8-9.5)
20-25 (2.3-2.8)
Oil Pump Bolts
Clutch Coil Assembly Nuts
Shift Shaft & Shift Cam Set Screw Speedometer Screw
WIRING DIAGRAMS
Fig. 25: Shift Transfer Case Schematic (Electronic shift models only - Bronco)
Fig. 26: Transfer Case Wiring Diagram (Electronic shift models only - Bronco II & Ranger)
Fig. 27: Transfer Case Wiring Diagram (1992-94 Explorer & Ranger)
Images (Click to make bigger)
SPONSORED LINKS
Saturday, December 31st, 2011 AT 3:29 AM